


本頁說明如何從私有 Cloud Data Fusion 執行個體開發管道時,連線至 Salesforce 等軟體即服務 (SaaS) 應用程式,以及 Amazon S3 等第三方雲端服務。
本指南會使用「輸出」和「輸出控制項」這兩個字詞:
輸出是指透過公開網際網路離開 Google Cloud 的網路流量。通常,當您建立從 Salesforce 等軟體即服務 (SaaS) 服務或 Amazon S3 等公有雲服務讀取或寫入資料的管道時,就會發生輸出作業。
輸出控制會使用 Proxy VM 定義輸出流量的防護措施,允許輸出流量傳送至一組預先設定的網域,並禁止傳送至其他網域。這項功能可為輸出流量提供更高的安全防護範圍,並防止私人執行個體輸出不必要的流量。
下圖的系統架構顯示您開發管道時,私有 Cloud Data Fusion 執行個體如何連線至公用網際網路:
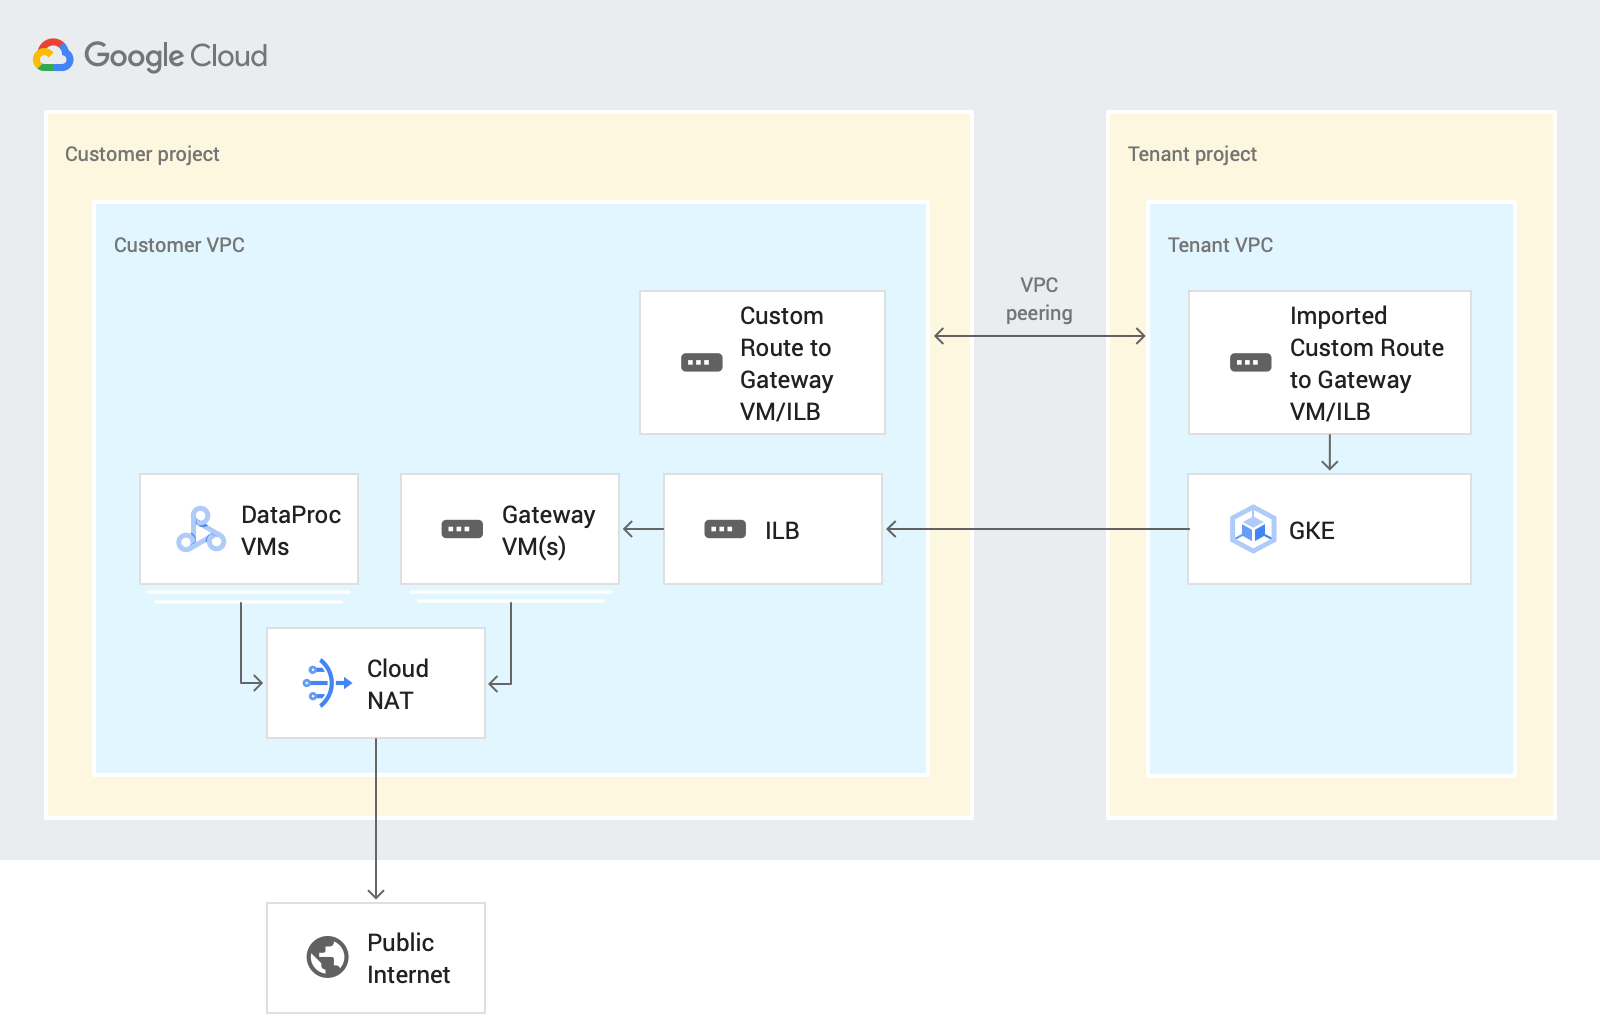
在此情境中設計管道時,Cloud Data Fusion 會透過 Cloud Data Fusion Preview 或 Wrangler 中的客戶專案,傳送輸出流量。這項程序會使用下列資源:
自訂虛擬私有雲網路路徑:自訂虛擬私有雲網路會透過匯入的自訂路徑,將流量傳送至閘道 VM,然後使用 虛擬私有雲對等互連匯出至租戶專案虛擬私有雲。
閘道 VM:閘道 VM 會將輸出流量從 Cloud Data Fusion 租戶專案的 Google Cloud 路由至 SaaS 或第三方雲端,並透過公開網際網路傳輸。您可以在客戶專案中管理這個 VM。您可以使用內部負載平衡器 (ILB),在高可用性 (HA) 環境中設定這項功能。建議您在同一個 VPC 中,為多個私有 Cloud Data Fusion 執行個體重複使用 VM。
如要瞭解如何在設計和執行環境中設定輸出控制項,請參閱「在私人執行個體中控制輸出」。
事前準備
在 Cloud Data Fusion 6.4 以上版本中,您可以從私人執行個體連線至公開來源。如要使用這些版本,您可以建立新的私人 Cloud Data Fusion 執行個體,或將現有執行個體升級至 6.4.0。
為執行個體建立虛擬私有雲網路對等互連連線時,請選取「匯出路徑」。
設定網際網路連線
下列步驟說明如何從 Wrangler 中的私人 Cloud Data Fusion 執行個體存取 Amazon S3 值區。在「預覽」或 Wrangler 中設計管道時,存取公開網際網路上任何資料來源的步驟都相同。
本指南只會使用單一 VM,但對於任務關鍵型應用程式,建議您建立負載平衡 VM。詳情請參閱「設定高可用性 VM」。
建立 NAT 閘道
在與 Cloud Data Fusion 私人執行個體相同的區域和虛擬私有雲網路中,建立 Cloud NAT 閘道。
建立閘道 VM 執行個體和防火牆規則
控制台
前往「VM instances」(VM 執行個體) 頁面。
按一下「Create instance」(建立執行個體)。建議使用沒有外部 IP 的 VM。
使用與私人 Cloud Data Fusion 執行個體建立網路對等互連的虛擬私有雲。如要進一步瞭解這個情境中的虛擬私有雲網路對等互連,請參閱「事前準備」。
為與 Cloud Data Fusion 執行個體位於相同網路的執行個體啟用 IP 轉送。
在「Startup script」(開機指令碼) 欄位中,輸入下列指令碼:
#! /bin/bash echo 1 > /proc/sys/net/ipv4/ip_forward iptables -t nat -A POSTROUTING -s 0.0.0.0/0 -j MASQUERADE echo net.ipv4.ip_forward=1 > /etc/sysctl.d/11-gce-network-security.conf iptables-save詳情請參閱「執行啟動指令碼」。
如要取得 Cloud Data Fusion 執行個體的已分配 IP 範圍,請前往 Cloud Data Fusion 的「Instance details」(執行個體詳細資料) 頁面。

gcloud
如要建立閘道 VM 和防火牆規則,請在 Google Cloud CLI 中執行下列指令碼:
export CDF_PROJECT=CDF_PROJECT
export GATEWAY_VM=GATEWAY_VM_NAME
export ZONE=VM_ZONE
export SUBNET=SUBNET
export VPC_NETWORK=VPC_NETWORK
export COMPUTE_ENGINE_SA=COMPUTE_ENGINE_SA

gcloud beta compute --project=$CDF_PROJECT instances create $GATEWAY_VM --zone=$ZONE --machine-type=e2-medium --subnet=$SUBNET --network-tier=PREMIUM --metadata=startup-script=\#\!\ /bin/bash$'\n'echo\ 1\ \>\ /proc/sys/net/ipv4/ip_forward$'\n'iptables\ -t\ nat\ -A\ POSTROUTING\ -s\ 0.0.0.0/0\ -j\ MASQUERADE$'\n'echo\ net.ipv4.ip_forward=1\ \>\ /etc/sysctl.d/11-gce-network-security.conf$'\n'iptables-save  --can-ip-forward --no-address --maintenance-policy=MIGRATE --service-account=$COMPUTE_ENGINE_SA --scopes=https://www.googleapis.com/auth/devstorage.read_only,https://www.googleapis.com/auth/logging.write,https://www.googleapis.com/auth/monitoring.write,https://www.googleapis.com/auth/servicecontrol,https://www.googleapis.com/auth/service.management.readonly,https://www.googleapis.com/auth/trace.append --tags=http-server,https-server --image=debian-10-buster-v20210316 --image-project=debian-cloud --boot-disk-size=10GB --boot-disk-type=pd-balanced --boot-disk-device-name=$GATEWAY_VM --no-shielded-secure-boot --shielded-vtpm --shielded-integrity-monitoring --reservation-affinity=any

gcloud compute --project=$CDF_PROJECT firewall-rules create egress-allow-http --direction=INGRESS --priority=1000 --network=$VPC_NETWORK --action=ALLOW --rules=tcp:80 --source-ranges=CDF_IP_RANGE --target-tags=http-server

gcloud compute --project=$CDF_PROJECT firewall-rules create egress-allow-https --direction=INGRESS --priority=1000 --network=$VPC_NETWORK --action=ALLOW --rules=tcp:443 --source-ranges=CDF_IP_RANGE --target-tags=https-server
更改下列內容:
- CDF_PROJECT:專案的可自訂專屬 ID
- GATEWAY_VM:要設定的 VM 名稱
- ZONE:VM 的可用區
- SUBNET:子網路
- VPC_NETWORK:VM 名稱
- COMPUTE_ENGINE_SA:Compute Engine 服務帳戶的名稱
- CDF_IP_RANGE:分配給 Cloud Data Fusion 執行個體的 IP 範圍
使用共用虛擬私有雲
如果您使用共用虛擬私有雲,將私有 Cloud Data Fusion 執行個體連線至公用網際網路上的來源,請在主專案中建立閘道 VM,並在該專案中設定與租戶專案的虛擬私有雲網路對等互連。
建立自訂路線
建立自訂路徑,連線至您建立的閘道 VM 執行個體。
控制台
如要在 Google Cloud 控制台中建立路徑,請參閱「新增靜態路徑」。
設定路徑時:
- 將「Priority」設為大於或等於
1001。將目的地設為分配給 Cloud Data Fusion 執行個體的 IP 範圍。 - 使用與 Cloud Data Fusion 私人執行個體相同的專案和 VPC。
- 請務必確認虛擬私有雲網路對等互連設定允許匯出路徑,這樣 Cloud Data Fusion 租戶專案虛擬私有雲才能透過虛擬私有雲網路對等互連匯入這個自訂路徑。
gcloud
如要在 gcloud CLI 中建立路徑:
export ROUTE=ROUTE
gcloud beta compute routes create $ROUTE --project=$CDF_PROJECT \
    --network=$VPC_NETWORK --priority=1001 \
    --destination-range=0.0.0.0/0 \
    --next-hop-instance=$GATEWAY_VM \
    --next-hop-instance-zone=$ZONE
更改下列內容:
- ROUTE:自訂路由的名稱。
驗證設定
完成上述步驟後,請確認您可以在 Preview 和 Wrangler 中存取 S3 儲存空間服務 (或其他 SaaS 或公有雲服務)。
設定高可用性閘道
建議:對於執行重要任務的應用程式,建議您建立負載平衡的 VM。
為健康狀態檢查建立防火牆規則
建立防火牆規則,允許下列存取作業:
- 來自所有來源範圍的通訊埠 80 (HTTP) 和通訊埠 443 (HTTPS)。
來自健康狀態檢查探測器 IP 位址的 TCP、UDP 和 ICMP 流量。例如:
130.211.0.0/22,35.191.0.0/16。
控制台
建立防火牆規則,允許來自所有來源範圍的通訊埠,以及允許來自健康狀態檢查探測器 IP 位址 (例如 130.211.0.0/22,35.191.0.0/16) 的 TCP、UDP 和 ICMP 流量。
請參閱「建立健康狀態檢查」。
gcloud
建立健康狀態檢查的防火牆規則:
export CDF_PROJECT=PROJECT_ID
export VPC_NETWORK=VPC_NETWORK

gcloud compute --project=$CDF_PROJECT firewall-rules create vpc-allow-http \
    --direction=INGRESS --priority=1000 \
    --network=$VPC_NETWORK \
    --action=ALLOW --rules=tcp:80 \
    --source-ranges=CDF_IP_RANGE \
    --target-tags=http-server

gcloud compute --project=$CDF_PROJECT firewall-rules create vpc-allow-https \
    --direction=INGRESS --priority=1000 --network=$VPC_NETWORK \
    --action=ALLOW --rules=tcp:443 --source-ranges=CDF_IP_RANGE \
    --target-tags=https-server

gcloud compute --project=$CDF_PROJECT firewall-rules create allow-health-checks \
    --network=$VPC_NETWORK \
    --action=allow --direction=ingress \
    --target-tags=allow-health-checks \
    --source-ranges=130.211.0.0/22,35.191.0.0/16 \
    --rules=tcp,udp,icmp
更改下列內容:
- PROJECT_ID:專案的可自訂專屬 ID。
- VPC_NETWORK:虛擬私有雲網路的名稱。
- CDF_IP_RANGE:分配給 Cloud Data Fusion 的 IP 位址範圍。
建立閘道 VM 執行個體範本
控制台
在控制台中建立執行個體範本時:
- 請在與 Cloud Data Fusion 執行個體相同的 VPC 中建立。
- 建議:使用具有私人 IP 位址的 VM。
- 啟用 HTTP/HTTPS 連接埠。
- 啟用 IP 轉送
在「Startup script」(開機指令碼) 欄位中,輸入下列指令碼:
#! /bin/bash echo 1 > /proc/sys/net/ipv4/ip_forward iptables -t nat -A POSTROUTING -s 0.0.0.0/0 -j MASQUERADE echo net.ipv4.ip_forward=1 > /etc/sysctl.d/11-gce-network-security.conf iptables-save詳情請參閱「執行啟動指令碼」。
如要取得 Cloud Data Fusion 執行個體的已分配 IP 範圍,請前往 Cloud Data Fusion 的「Instance details」(執行個體詳細資料) 頁面。
gcloud
建立執行個體範本:
export TEMPLATE_NAME=TEMPLATE_NAME
export REGION=REGION
export SUBNET=SUBNET
export SERVICE_ACCOUNT=SERVICE_ACCOUNT

gcloud beta compute --project=$CDF_PROJECT instance-templates create $TEMPLATE_NAME \
--machine-type=e2-medium \
--subnet=projects/$CDF_PROJECT/regions/$REGION/subnetworks/$SUBNET \
--network-tier=PREMIUM --metadata=startup-script=sudo\ bash\ -c\ \"echo\ 1\ \>\ /proc/sys/net/ipv4/ip_forward\"$'\n'sudo\ iptables\ -t\ nat\ -A\ POSTROUTING\ -s\ 0.0.0.0/0\ -j\ MASQUERADE$'\n'sudo\ bash\ -c\ \"echo\ net.ipv4.ip_forward=1\ \>\ /etc/sysctl.d/11-gce-network-security.conf\"$'\n'sudo\ iptables-save \
--can-ip-forward --no-address --maintenance-policy=MIGRATE \
--service-account=$SERVICE_ACCOUNT \
--scopes=https://www.googleapis.com/auth/devstorage.read_only,https://www.googleapis.com/auth/logging.write,https://www.googleapis.com/auth/monitoring.write,https://www.googleapis.com/auth/servicecontrol,https://www.googleapis.com/auth/service.management.readonly,https://www.googleapis.com/auth/trace.append \
--region=$REGION --tags=http-server,https-server,allow-health-checks \
--image=debian-10-buster-v20210316 \
--image-project=debian-cloud --boot-disk-size=10GB \
--boot-disk-type=pd-balanced \
--boot-disk-device-name=$TEMPLATE_NAME \
--no-shielded-secure-boot --no-shielded-vtpm \
--no-shielded-integrity-monitoring \
--reservation-affinity=any
建立健康狀態檢查
這個閘道 VM 執行個體上沒有任何服務,因此您可以將通訊埠 22 用於健康狀態檢查。
控制台
請參閱「建立健康狀態檢查」。
gcloud
建立健康狀態檢查:
export HEATH_CHECK=HEALTH_CHECK_NAME

gcloud beta compute health-checks create tcp $HEATH_CHECK --project=$CDF_PROJECT \
--port=22 --proxy-header=NONE --no-enable-logging \
--check-interval=5 --timeout=5 \
--unhealthy-threshold=2 --healthy-threshold=2
建立執行個體群組
使用上一步建立的健康狀態檢查,建立執行個體群組:
控制台
請參閱建立代管執行個體群組。
gcloud
建立執行個體群組:
export INSTANCE_GROUP=INSTANCE_GROUP
gcloud beta compute --project=$CDF_PROJECT instance-groups managed create $INSTANCE_GROUP \
--base-instance-name=$INSTANCE_GROUP \
--template=$TEMPLATE_NAME --size=1 --zone=$ZONE \
--health-check=test --initial-delay=300

gcloud beta compute --project "$CDF_PROJECT" instance-groups managed set-autoscaling "$INSTANCE_GROUP" \
--zone "$ZONE" --cool-down-period "60" \
--max-num-replicas "10" --min-num-replicas "1" \
--target-cpu-utilization "0.6" --mode "on"
建立負載平衡器
從上一步建立的執行個體群組建立 TCP 負載平衡器 (ILB)。
將自訂路徑新增至負載平衡器
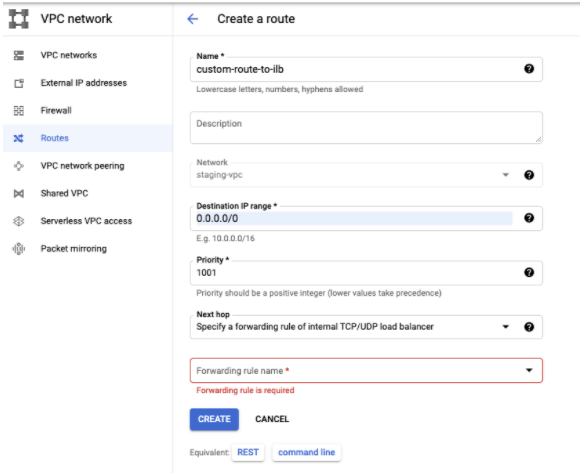
在與 Cloud Data Fusion 執行個體相同的 VPC 中,將自訂路由新增至內部負載平衡器 (ILB)。
控制台
前往「虛擬私有雲網路」頁面。
在「路徑」分頁中,按一下「建立路徑」。
gcloud
將自訂路徑新增至內部負載平衡器:
export ROUTE=ROUTE_NAME
export ILB_FRONTEND=<ip_of_ilb_frontend>
gcloud beta compute routes create $ROUTE --project=$CDF_PROJECT \
--network=$VPC_NETWORK --priority=1001 \
--destination-range=0.0.0.0/0 \
--next-hop-ilb=$ILB_FRONTEND \
--next-hop-ilb-region=$REGION
疑難排解
在預覽或 Wrangler 中收到連線逾時錯誤
設定輸出控管時,可能會發生 Connection Timeout 錯誤。
如要修正這個問題,請確認已完成下列設定:
- 租戶專案與客戶專案之間存在虛擬私有雲網路對等互連。
- 虛擬私有雲網路對等互連已啟用「匯出」路徑。
- 通往閘道 VM 或 ILB 的自訂路徑並未遺失。
- 允許
HTTP和HTTPS流量的防火牆規則並未遺失。
執行個體群組健康狀態檢查失敗
檢查防火牆規則,確認允許來自 130.211.0.0/22,35.191.0.0/16 來源範圍的 TCP、UDP 和 ICMP 流量。
在 Managed Service for Apache Spark 中執行時,管道失敗
如要在執行階段存取公開網際網路,請在與 Managed Service for Apache Spark 叢集相同的區域和網路中啟用 Cloud NAT。
後續步驟
- 瞭解如何控管私人 Cloud Data Fusion 執行個體中的輸出流量,只允許特定網域。
- 進一步瞭解 Cloud Data Fusion 中的網路。