


本指南說明如何使用 Google 預先建立的搜尋空間和預先建立的訓練程式碼 (以 TF-vision 為基礎),執行 Agent Platform 類神經架構搜尋作業,適用於 MnasNet 和 SpineNet。如需端對端範例,請參閱 MnasNet 分類筆記本和 SpineNet 物件偵測筆記本。
預先建構訓練工具的資料準備過程
Agent Platform Neural Architecture Search 預先建構的訓練工具需要 TFRecord 格式的資料,其中包含 tf.train.Example。tf.train.Example 必須包含下列欄位:
'image/encoded': tf.FixedLenFeature(tf.string)
'image/height': tf.FixedLenFeature(tf.int64)
'image/width': tf.FixedLenFeature(tf.int64)

# For image classification only.
'image/class/label': tf.FixedLenFeature(tf.int64)

# For object detection only.
'image/object/bbox/xmin': tf.VarLenFeature(tf.float32)
'image/object/bbox/xmax': tf.VarLenFeature(tf.float32)
'image/object/bbox/ymin': tf.VarLenFeature(tf.float32)
'image/object/bbox/ymax': tf.VarLenFeature(tf.float32)
'image/object/class/label': tf.VarLenFeature(tf.int64)
如要瞭解如何準備 ImageNet 資料,請參閱這篇文章。
如要轉換自訂資料,請使用下載的程式碼範例和公用程式隨附的剖析指令碼。如要自訂資料剖析作業,請修改 tf_vision/dataloaders/*_input.py 檔案。
進一步瞭解TFRecord和tf.train.Example。
定義實驗環境變數
執行實驗前,您需要定義多個環境變數,包括:
- TRAINER_DOCKER_ID:
${USER}_nas_experiment(建議格式) 實驗使用的訓練和驗證資料集 Cloud Storage 位置。例如 (用於偵測的 CoCo):
gs://cloud-samples-data/ai-platform/built-in/image/coco/train*gs://cloud-samples-data/ai-platform/built-in/image/coco/val*
實驗輸出的 Cloud Storage 位置。 建議格式:
gs://${USER}_nas_experiment
REGION:區域,應與實驗輸出 bucket 區域相同。例如:
us-central1。PARAM_OVERRIDE:覆寫預先建立的訓練程式參數的 .yaml 檔案。Agent Platform Neural Architecture Search 提供一些可用的預設設定:
PROJECT_ID=PROJECT_ID
TRAINER_DOCKER_ID=TRAINER_DOCKER_ID
LATENCY_CALCULATOR_DOCKER_ID=LATENCY_CALCULATOR_DOCKER_ID
GCS_ROOT_DIR=OUTPUT_DIR
REGION=REGION
PARAM_OVERRIDE=tf_vision/configs/experiments/spinenet_search_gpu.yaml
TRAINING_DATA_PATH=gs://PATH_TO_TRAINING_DATA
VALIDATION_DATA_PATH=gs://PATH_TO_VALIDATION_DATA
建議您選取和/或修改符合訓練需求的覆寫檔案。請考量下列事項:
- 您可以設定
--accelerator_type,選擇使用 GPU 或 CPU。 如要使用 CPU 快速測試,只執行幾個訓練週期,可以設定--accelerator_type=""標記,並使用tf_vision/test_files/fast_nas_detection_spinenet_search_for_testing.yaml設定檔。 - 訓練週期數
- 訓練執行階段
- 學習率等超參數
如需控管訓練工作的完整參數清單,請參閱 tf_vision/configs/。以下是重要參數:
task:
  train_data:
    global_batch_size: 80
  validation_data:
    global_batch_size: 16
  init_checkpoint: null
trainer:
  train_steps: 16634
  steps_per_loop: 1386
  optimizer_config:
    learning_rate:
      cosine:
        initial_learning_rate: 0.16
        decay_steps: 16634
      type: 'cosine'
    warmup:
      type: 'linear'
      linear:
        warmup_learning_rate: 0.0067
        warmup_steps: 1386
建立 Cloud Storage bucket,供 Agent Platform Neural Architecture Search 儲存工作輸出內容 (即檢查點):
gcloud storage buckets create $GCS_ROOT_DIR
建構訓練師容器和延遲計算機容器
下列指令會在 Google Cloud 中建構訓練人員映像檔,並使用下列 URI:gcr.io/PROJECT_ID/TRAINER_DOCKER_ID,這會在下一步的 Agent Platform Neural Architecture Search 工作中使用。
python3 vertex_nas_cli.py build \
--project_id=PROJECT_ID \
--trainer_docker_id=TRAINER_DOCKER_ID \
--latency_calculator_docker_id=LATENCY_CALCULATOR_DOCKER_ID \
--trainer_docker_file=tf_vision/nas_multi_trial.Dockerfile \
--latency_calculator_docker_file=tf_vision/latency_computation_using_saved_model.Dockerfile
如要變更搜尋空間和獎勵,請在 Python 檔案中更新,然後重建 Docker 映像檔。
在本機測試訓練程式
在 Google Cloud 服務中啟動工作需要幾分鐘,因此在本機測試訓練師 Docker 可能更方便,例如驗證 TFRecord 格式。以 spinenet 搜尋空間為例,您可以在本機執行搜尋作業 (模型會隨機取樣):
# Define the local job output dir.
JOB_DIR="/tmp/iod_${search_space}"

python3 vertex_nas_cli.py search_in_local \
--project_id=PROJECT_ID \
--trainer_docker_id=TRAINER_DOCKER_ID \
--prebuilt_search_space=spinenet \
--use_prebuilt_trainer=True \
--local_output_dir=${JOB_DIR} \
--search_docker_flags \
params_override="tf_vision/test_files/fast_nas_detection_spinenet_search_for_testing.yaml" \
training_data_path=TEST_COCO_TF_RECORD \
validation_data_path=TEST_COCO_TF_RECORD \
model=retinanet
training_data_path 和 validation_data_path 是 TFRecord 的路徑。
在 Google Cloud上啟動第 1 階段搜尋,然後啟動第 2 階段訓練工作。
如需端對端範例,請參閱 MnasNet 分類筆記本和 SpineNet 物件偵測筆記本。
您可以設定
--max_parallel_nas_trial和--max_nas_trial旗標進行自訂。Agent Platform Neural Architecture Search 會平行啟動max_parallel_nas_trial測試,並在max_nas_trial測試完成後結束。如果設定
--target_device_latency_ms旗標,系統會啟動另一個latency calculator工作,並使用--target_device_type旗標指定的加速器。Agent Platform Neural Architecture Search Controller 會透過 FLAG
--nas_params_str,為每項測試提供新的架構候選項目建議。每次試驗都會根據 FLAG
nas_params_str的值建構圖表,並啟動訓練工作。每次試驗也會將值儲存至 JSON 檔案 (位於os.path.join(nas_job_dir, str(trial_id), "nas_params_str.json"))。
設有延遲時間限制的獎勵
MnasNet 分類筆記本會顯示以雲端 CPU 裝置為基礎的延遲時間限制搜尋範例。
如要搜尋具有延遲限制的模型,訓練者可以將準確度和延遲時間的函數回報為獎勵。
在共用原始碼中,獎勵的計算方式如下:
def compute_reward(target_latency, accuracy, inference_latency, weight=0.07):
  """Compute reward from accuracy and latency."""
  speed_ratio = target_latency / inference_latency
  return accuracy * (speed_ratio**weight)
您可以在第 3 頁的 mnasnet 論文中使用 reward 計算的其他變體。
target_device_type指定 支援的 Google Cloud目標裝置類型,例如NVIDIA_TESLA_P100。use_prebuilt_latency_calculator使用我們預先建構的延遲計算機tf_vision/latency_computation_using_saved_model.py。target_device_latency_ms指定目標裝置延遲時間。
如要瞭解如何自訂延遲時間計算函式,請參閱 tf_vision/latency_computation_using_saved_model.py。
監控 Agent Platform Neural Architecture Search 工作進度
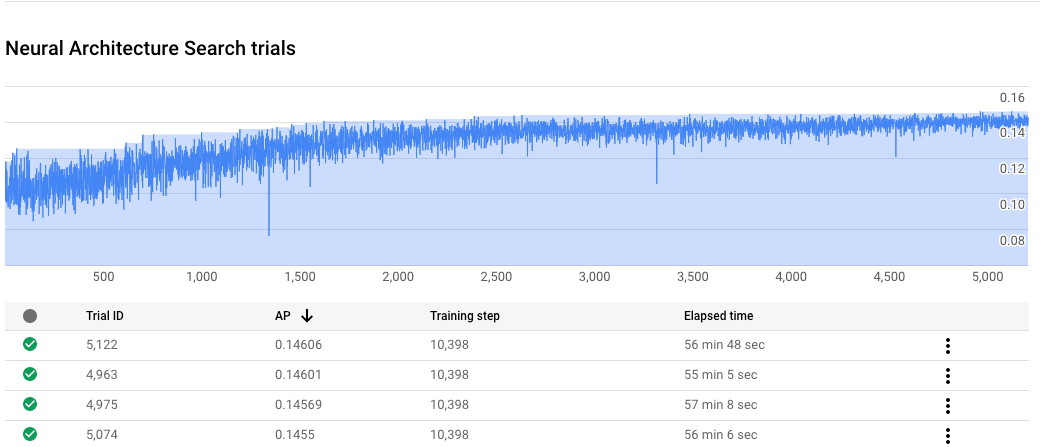
在 Google Cloud 控制台的工作頁面中,圖表會顯示 reward vs. trial number,表格則會顯示每次試驗的獎勵。你可以找到獎勵最高的熱門試用活動。
繪製第 2 階段的訓練曲線
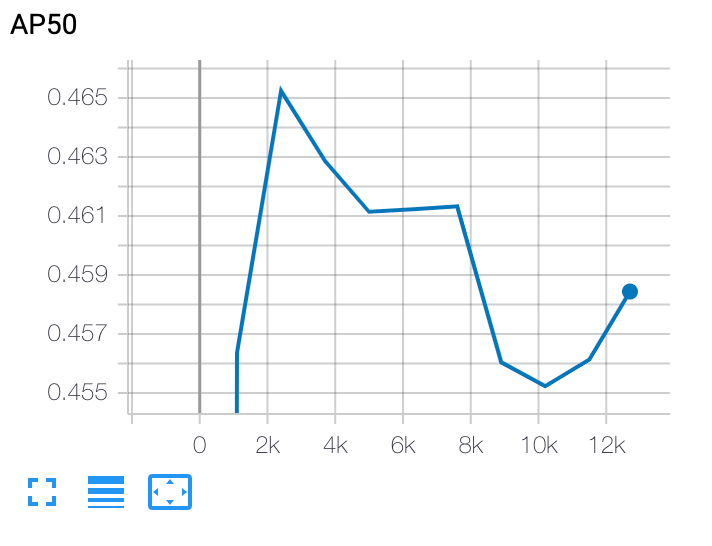
完成第 2 階段訓練後,請使用 Cloud Shell 或 Google Cloud
TensorBoard 指向工作目錄,繪製訓練曲線:
部署所選模型
如要建立 SavedModel,可以使用 export_saved_model.py 指令碼搭配 params_override=${GCS_ROOT_DIR}/${TRIAL_ID}/params.yaml。