


透過無 Proxy gRPC 服務設定進階流量管理
這項設定適用於預先發布版客戶,但我們不建議新的 Cloud Service Mesh 使用者採用。詳情請參閱「Cloud Service Mesh 服務路由總覽」。
本文提供操作說明,協助您設定 Cloud Service Mesh,並使用下列流量管理功能:
- 路徑比對
- 流量拆分
- 斷路機制
- 錯誤植入
- 最長串流時間
- 重試
- 工作階段相依性
- 離群值偵測
- 地區負載平衡
本文著重於在 Compute Engine 上,透過無 Proxy 的 gRPC 設定進階流量管理,但您也可以在 Google Kubernetes Engine (GKE) 上使用無 Proxy 的 gRPC,設定進階流量管理。
事前準備
設定進階流量管理功能之前,請先查看「準備設定使用無 Proxy gRPC 服務的 Cloud Service Mesh」中的需求條件。如未滿足所有條件,就無法設定進階流量管理。
如要瞭解這些功能的概念資訊,請參閱「進階流量管理」。
關於 gRPC 錢包範例
如要說明這些功能,請部署 gRPC 錢包範例。在本範例中,有三個 gRPC 服務:grpc.examples.wallet.Wallet、grpc.examples.wallet.stats.Stats 和 grpc.examples.wallet.account.Account,分別部署為三個不同的應用程式。
如下圖所示,您會建立 gRPC 用戶端,呼叫 Wallet 服務來取得帳戶餘額,並呼叫 Stats 服務來取得硬幣價格。Wallet 服務會呼叫 Stats 和 Account 服務來計算餘額。Stats 服務也會呼叫 Account 服務來取得使用者資訊。
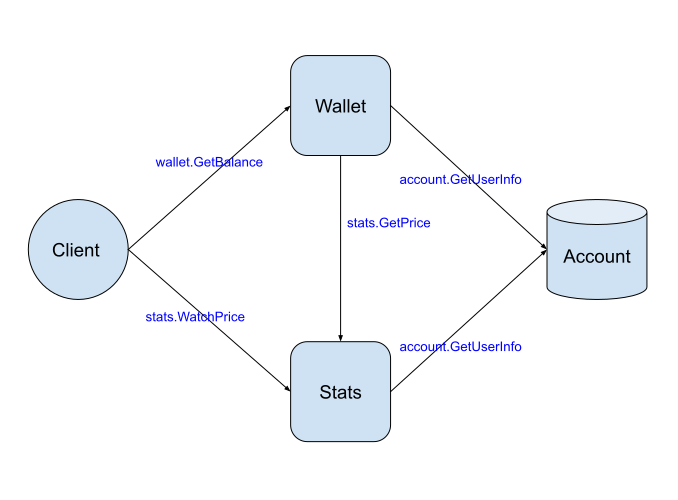
在本範例中,您會部署 Wallet 和 Stats 實作的兩個版本,說明如何根據您設定的規則轉送要求。如要模擬建構及部署不同版本的服務,請使用伺服器旗標變更只建構一次的二進位檔行為。
--port旗標會指定 VM 執行個體上服務接聽的通訊埠。--hostname_suffix旗標會指定附加至 VM 執行個體主機名稱的值,該執行個體會回應要求。產生的值會以hostname中繼資料的形式新增至回應。這有助於識別執行個體群組中回應用戶端要求的執行個體。- 值為
true的--premium_only旗標會指定服務為stats服務的進階版。 --v1_behavior標記和true值會指定錢包二進位檔的行為與 v1 版本相同。
下表顯示執行其中一項 gRPC 服務的每個 VM 執行個體,以及執行個體群組中的執行個體數量和這些執行個體群組所屬的後端服務,這些旗標的值。
| 後端服務 | 執行個體群組 | 執行個體 | 伺服器旗標 |
|---|---|---|---|
account |
account |
2 | --port=50053--hostname_suffix="account"
|
stats |
stats |
2 | --port=50052--hostname_suffix="stats"--account_server="xds:///account.grpcwallet.io"
|
stats-premium |
stats-premium |
2 | --port=50052--hostname_suffix="stats_premium"--account_server="xds:///account.grpcwallet.io"--premium_only=true
|
wallet-v1wallet-v1-affinity
|
wallet-v1 |
2 | --port=50051--hostname_suffix="wallet_v1"--v1_behavior=true--account_server="xds:///account.grpcwallet.io"--stats_server="xds:///stats.grpcwallet.io"
|
wallet-v2 |
wallet-v2 |
1 | --port=50051--hostname_suffix "wallet_v2"--account_server="xds:///account.grpcwallet.io"--stats_server="xds:///stats.grpcwallet.io"
|
部署這些服務後,請根據下表中的轉送規則,設定 Cloud Service Mesh 將要求從測試用戶端轉送至這些後端服務。用戶端會連線至服務的虛擬主機名稱,如「主機」欄所示。
| 主機 | 比對規則 | 轉送動作 |
|---|---|---|
wallet.grpcwallet.io |
路徑前置字串:"/"標頭存在: "session_id"
|
前往「wallet-v1-affinity」的路線 |
路徑前置字串:"/"標頭: {"route": "timeout"}
|
設定 5 秒逾時和 路由至 wallet-v2
|
|
路徑前置字串:"/"標頭: {"route": "fault"}
|
50% 的要求會失敗,其餘要求則會轉送至 wallet-v2
|
|
路徑前置字串:"/"標頭: {"membership": "premium"}
|
前往 wallet-v1 和 ,失敗時最多重試 3 次 |
|
完整路徑:/grpc.examples.wallet.Wallet/FetchBalance |
路線:wallet-v1:70%wallet-v2:30%
|
|
| 預設 | 前往「wallet-v1」的路線 |
|
stats.grpcwallet.io |
路徑前置字串:"/"標頭: {"membership": "premium"}
|
前往「stats-premium」的路線 |
| 預設 | 前往「stats」的路線 |
|
account.grpcwallet.io |
路徑前置字串:"/"標頭: {"route": "account-fault"}
|
30% 的要求會失敗,其餘要求則會轉送至 account
|
| 預設 | account |
這個範例會將流量分配到兩項現有服務,比例為 70/30。如果您要將流量分配給先前未由網址對應參照的新服務,請先將新服務新增至 weightedBackendServices,並將權重設為 0。然後逐步增加指派給該服務的權重。
測試用戶端提供下列選項,可讓您產生適當的要求,展示流量管理功能。
| 選項 | 說明 |
|---|---|
--watch=true |
呼叫串流方法,即可查看餘額/價格 |
--unary_watch=true |
重複呼叫一元方法,即可查看餘額/價格 |
--user=Alice |
插入標頭 {"membership": "premium"} |
--user=Bob |
插入標頭 {"membership": "normal"} |
--route=value |
插入標頭 {"route": "value"} |
--affinity=true |
插入標頭 {"session_id": "value"} |
準備本機環境
如要為這些範例設定本機環境,請執行下列指令:
更新
gcloud二進位檔,確保您使用的是最新版本:gcloud components update
下載範例存放區:
sudo apt-get install git -y
複製範例的正確存放區:
export EXAMPLES_VERSION=v1.1.x
git clone -b $EXAMPLES_VERSION --single-branch --depth=1 \
  https://github.com/GoogleCloudPlatform/traffic-director-grpc-examples.git
建立及設定 Cloud Router 執行個體
在本節中,您將在每個區域建立 Cloud Router 執行個體,並為 Cloud NAT 設定這些執行個體。本範例建立的 VM 沒有外部 IP 位址,但需要存取網際網路。設定 Cloud Router 和 Cloud NAT 即可提供必要存取權。
gcloud
建立 Cloud Router 執行個體:
gcloud compute routers create nat-router-us-central1 \
    --network=default \
    --region=us-central1
為 Cloud NAT 設定路由器:
gcloud compute routers nats create nat-config \
    --router-region=us-central1 \
    --router=nat-router-us-central1 \
    --nat-all-subnet-ip-ranges \
    --auto-allocate-nat-external-ips
建立 gRPC 健康狀態檢查和防火牆規則
在本節中,您會建立 gRPC 健康狀態檢查和防火牆規則,允許 gRPC 健康狀態檢查要求連線至您的網路。稍後,gRPC 健康狀態檢查會與後端服務建立關聯,以便檢查這些後端服務的後端執行個體健康狀態。
gcloud
建立健康狀態檢查:
gcloud compute health-checks create grpc grpcwallet-health-check \
    --use-serving-port
建立健康狀態檢查的防火牆規則:
gcloud compute firewall-rules create grpcwallet-allow-health-checks \
    --network default --action allow --direction INGRESS \
    --source-ranges 35.191.0.0/16,130.211.0.0/22 \
    --target-tags allow-health-checks \
    --rules tcp:50051-50053
建立執行個體範本
在本節中,您將建立執行個體範本,以部署通訊埠 50053 上公開的 account gRPC 服務。
gcloud
建立執行個體範本:
gcloud compute instance-templates create grpcwallet-account-template \
   --scopes=https://www.googleapis.com/auth/cloud-platform \
   --tags=allow-health-checks \
   --network-interface=no-address \
   --image-family=debian-10 \
   --image-project=debian-cloud \
   --metadata-from-file=startup-script=<(echo "#! /bin/bash
set -ex
cd /root
export HOME=/root
sudo apt-get update -y
pushd \$(mktemp -d)
sudo apt-get install -y wget git
wget https://dl.google.com/go/go1.16.5.linux-amd64.tar.gz
sudo tar -C /usr/local -xvf go1.16.5.linux-amd64.tar.gz
sudo cp /usr/local/go/bin/go /usr/bin/go
popd
git clone -b $EXAMPLES_VERSION --single-branch --depth=1 https://github.com/GoogleCloudPlatform/traffic-director-grpc-examples.git
cd traffic-director-grpc-examples/go/account_server/
go build .
sudo systemd-run ./account_server --port 50053 --hostname_suffix account")
建立代管執行個體群組
代管執行個體群組 (MIG) 會視需要使用自動調度資源功能建立新的 VM 執行個體。在本節中,您將使用上一節建立的執行個體範本,建立 MIG。
gcloud
建立執行個體群組:
gcloud compute instance-groups managed create grpcwallet-account-mig-us-central1 \
   --zone=us-central1-a \
   --size=2 \
   --template=grpcwallet-account-template
設定具名通訊埠
在本節中,您將設定 gRPC 服務的已命名通訊埠。具名通訊埠是 gRPC 服務監聽要求的通訊埠。在這個範例中,具名通訊埠是通訊埠 50053。
gcloud
建立具名通訊埠:
gcloud compute instance-groups set-named-ports grpcwallet-account-mig-us-central1 \
   --named-ports=grpcwallet-account-port:50053 \
   --zone=us-central1-a
建立後端服務
在本節中,您將建立負載平衡機制為 INTERNAL_SELF_MANAGED 且通訊協定為 GRPC 的全域後端服務。然後將健康狀態檢查和執行個體群組與後端服務建立關聯。在本範例中,您會使用在「建立代管執行個體群組」中建立的 MIG。這個 MIG 會執行 account
gRPC 服務。--port-name 標記中的通訊埠是您在「設定已命名的通訊埠」中建立的已命名通訊埠。
gcloud
建立後端服務,然後將健康狀態檢查與新的後端服務建立關聯:
gcloud compute backend-services create grpcwallet-account-service \
    --global \
    --load-balancing-scheme=INTERNAL_SELF_MANAGED \
    --protocol=GRPC \
    --port-name=grpcwallet-account-port \
    --health-checks=grpcwallet-health-check
將代管執行個體群組新增為後端:
gcloud compute backend-services add-backend grpcwallet-account-service \
    --instance-group=grpcwallet-account-mig-us-central1 \
    --instance-group-zone=us-central1-a \
    --global
建立 gRPC Wallet 範例中其餘後端服務的步驟,與上述步驟類似。您將執行殼層指令碼,建立其餘服務。這個指令碼會部署下列後端服務:
statsstats-premiumwallet-v1wallet-v1-affinitywallet-v2
執行可建立其他後端服務的殼層指令碼:
traffic-director-grpc-examples/scripts/create_service.sh go stats 50052 stats '--account_server="xds:///account.grpcwallet.io"'

traffic-director-grpc-examples/scripts/create_service.sh go stats 50052 stats-premium '--account_server="xds:///account.grpcwallet.io" --premium_only=true'

# This command creates wallet-v1 and wallet-v1-affinity backend services.
traffic-director-grpc-examples/scripts/create_service.sh java wallet 50051 wallet-v1 '--account_server="xds:///account.grpcwallet.io" --stats_server="xds:///stats.grpcwallet.io" --v1_behavior=true'

traffic-director-grpc-examples/scripts/create_service.sh java wallet 50051 wallet-v2 '--account_server="xds:///account.grpcwallet.io" --stats_server="xds:///stats.grpcwallet.io"'
建立轉送規則
在本節中,您將建立網址對應,用來示範各種流量管理功能。網址對應會指定本範例中服務的虛擬主機名稱,以及相關聯的路由規則。詳情請參閱「路徑規則對應」。
在網址對應中,hostRules 會指定範例中服務的虛擬主機名稱。用戶端會在管道 URI 中使用這些名稱,連線至特定服務。舉例來說,如要將要求傳送至 account 服務,用戶端會在管道 URI 中使用 xds:///account.grpcwallet.io。在 hostRules 中,設定 hosts 項目,值為 account.grpcwallet.io。
與 hosts 項目相關聯的 pathMatcher 會指定 pathMatcher 的名稱,其中包含該虛擬主機的所有轉送規則。如「關於 gRPC 錢包範例」一文所述,pathMatcher 設定包含相符規則和對應的動作規則。
gcloud
建立網址對應:
export PROJECT_ID=$(gcloud config list --format 'value(core.project)')
export BS_PREFIX=projects/$PROJECT_ID/global/backendServices/grpcwallet

gcloud compute url-maps import grpcwallet-url-map << EOF
name: grpcwallet-url-map
defaultService: $BS_PREFIX-account-service

hostRules:
- hosts:
  - account.grpcwallet.io
  pathMatcher: grpcwallet-account-path-matcher
- hosts:
  - stats.grpcwallet.io
  pathMatcher: grpcwallet-stats-path-matcher
- hosts:
  - wallet.grpcwallet.io
  pathMatcher: grpcwallet-wallet-path-matcher

pathMatchers:
- name: grpcwallet-account-path-matcher
  defaultService: $BS_PREFIX-account-service
  routeRules:
  - matchRules:
    - prefixMatch: /
      headerMatches:
      - headerName: route
        exactMatch: account-fault
    priority: 0
    routeAction:
      weightedBackendServices:
      - backendService: $BS_PREFIX-account-service
        weight: 100
      faultInjectionPolicy:
        abort:
          httpStatus: 503
          percentage: 30

- name: grpcwallet-stats-path-matcher
  defaultService: $BS_PREFIX-stats-service
  routeRules:
  - matchRules:
    - prefixMatch: /
      headerMatches:
      - headerName: membership
        exactMatch: premium
    priority: 0
    service: $BS_PREFIX-stats-premium-service

- name: grpcwallet-wallet-path-matcher
  defaultService: $BS_PREFIX-wallet-v1-service
  routeRules:
  - matchRules:
    - prefixMatch: /
      headerMatches:
      - headerName: session_id
        presentMatch: true
    priority: 0
    routeAction:
      weightedBackendServices:
      - backendService: $BS_PREFIX-wallet-v1-affinity-service
        weight: 100

  - matchRules:
    - prefixMatch: /
      headerMatches:
      - headerName: route
        exactMatch: timeout
    priority: 1
    routeAction:
      weightedBackendServices:
      - backendService: $BS_PREFIX-wallet-v2-service
        weight: 100
      maxStreamDuration:
        seconds: 5

  - matchRules:
    - prefixMatch: /
      headerMatches:
      - headerName: route
        exactMatch: fault
    priority: 2
    routeAction:
      weightedBackendServices:
      - backendService: $BS_PREFIX-wallet-v2-service
        weight: 100
      faultInjectionPolicy:
        abort:
          httpStatus: 503
          percentage: 50

  - matchRules:
    - prefixMatch: /
      headerMatches:
      - headerName: membership
        exactMatch: premium
    priority: 3
    routeAction:
      weightedBackendServices:
      - backendService: $BS_PREFIX-wallet-v1-service
        weight: 100
      retryPolicy:
        retryConditions:
          - unavailable
        numRetries: 3

  - matchRules:
    - fullPathMatch: /grpc.examples.wallet.Wallet/FetchBalance
    priority: 4
    routeAction:
      weightedBackendServices:
      - backendService: $BS_PREFIX-wallet-v1-service
        weight: 70
      - backendService: $BS_PREFIX-wallet-v2-service
        weight: 30

  - matchRules:
    - prefixMatch: /grpc.examples.wallet.Wallet/
    priority: 5
    routeAction:
      weightedBackendServices:
      - backendService: $BS_PREFIX-wallet-v2-service
        weight: 100
EOF
建立目標 Proxy 和轉送規則
在本節中,您將建立目標 gRPC Proxy 和轉送規則。
目標 gRPC Proxy 會參照您在上一個步驟中建立的網址對應。
--validate-for-proxyless 旗標會啟用設定檢查,避免您不小心啟用與無代理程式 gRPC 部署作業不相容的功能。
gcloud
建立目標 gRPC Proxy:
gcloud compute target-grpc-proxies create grpcwallet-proxy \
   --url-map=grpcwallet-url-map \
   --validate-for-proxyless
轉送規則會參照您建立的目標 gRPC Proxy。負載平衡架構設為 INTERNAL_SELF_MANAGED,表示 Cloud Service Mesh 使用這個轉送規則。必須是通用轉送規則。IP 位址設為 0.0.0.0,因為無 Proxy 的 gRPC 用戶端會將目標 URI 中的 hostname:port 解析為傳送 LDS 要求給 Cloud Service Mesh,而不是進行 DNS 查詢。詳情請參閱「名稱解析機制」。
如果目標 URI 未指定通訊埠,預設值為 80。舉例來說,目標 URI xds:///foo.myservice:8080 符合設定通訊埠 8080 的轉送規則。在本範例中,轉送規則設定的通訊埠為 80。
gcloud
建立轉送規則:
gcloud compute forwarding-rules create grpcwallet-forwarding-rule \
   --global \
   --load-balancing-scheme=INTERNAL_SELF_MANAGED \
   --address=0.0.0.0 \
   --address-region=us-central1 \
   --target-grpc-proxy=grpcwallet-proxy \
   --ports=80 \
   --network=default
驗證設定
設定程序完成後,請前往 Google Cloud 控制台的「Cloud Service Mesh」頁面,確認您設定的後端服務是否可用。確認後端服務和相關聯的後端回報為「健康」。應該會在幾分鐘內完成。
驗證轉送設定
在本節中,您將驗證轉送設定是否正常運作。您可以使用 grpcurl 工具測試設定。
gcloud
建立用戶端 VM,並在該 VM 上執行用戶端來測試服務。您可以選擇加入
--network-interface=no-address旗標。gcloud compute instances create grpc-wallet-client \ --zone=us-central1-a \ --scopes=https://www.googleapis.com/auth/cloud-platform \ --image-family=debian-10 \ --image-project=debian-cloud \ --metadata-from-file=startup-script=<(echo '#! /bin/bash set -e export GRPC_XDS_BOOTSTRAP=/run/td-grpc-bootstrap.json # Expose bootstrap variable to SSH connections echo export GRPC_XDS_BOOTSTRAP=$GRPC_XDS_BOOTSTRAP | sudo tee /etc/profile.d/grpc-xds-bootstrap.sh # Create the bootstrap file curl -L https://storage.googleapis.com/traffic-director/td-grpc-bootstrap-0.19.0.tar.gz | tar -xz ./td-grpc-bootstrap-0.19.0/td-grpc-bootstrap | sudo tee $GRPC_XDS_BOOTSTRAP')使用 SSH 存取 VM,然後執行下列指令來準備 VM:
export EXAMPLES_VERSION=v1.1.x
sudo apt-get update
sudo apt-get install git -y
執行下列指令:
git clone -b $EXAMPLES_VERSION --single-branch --depth=1 \
   https://github.com/GoogleCloudPlatform/traffic-director-grpc-examples.git
curl -L https://github.com/fullstorydev/grpcurl/releases/download/v1.6.1/grpcurl_1.6.1_linux_x86_64.tar.gz | tar -xz
chmod +x grpcurl
如要在沒有 Sidecar Proxy 的情況下存取服務,gRPC 用戶端必須使用 xds 名稱解析配置。這個配置會告知用戶端使用的 gRPC 程式庫,要使用 xDS 伺服器解析主機名稱。如要執行這項操作,必須進行啟動設定。
上一節中的開機指令碼會設定 GRPC_XDS_BOOTSTRAP 環境變數,並使用輔助指令碼產生啟動程序檔案。產生的啟動程序檔案中,TRAFFICDIRECTOR_GCP_PROJECT_NUMBER、TRAFFICDIRECTOR_NETWORK_NAME 和區域的值是從中繼資料伺服器取得,該伺服器瞭解 Compute Engine VM 執行個體的這些詳細資料。您可以使用 -gcp-project-number 和 -vpc-network-name 選項,手動將這些值提供給輔助指令碼。
使用 grpcurl 工具驗證設定
在 SSH 殼層中執行下列指令,確認 wallet-service、stats-service 和 account-service 正在執行:
./grpcurl -plaintext xds:///account.grpcwallet.io list
./grpcurl -plaintext -d '{"token": "2bd806c9"}' xds:///account.grpcwallet.io grpc.examples.wallet.account.Account/GetUserInfo
./grpcurl -plaintext -H 'authorization:2bd806c9' -H 'membership:premium' xds:///stats.grpcwallet.io grpc.examples.wallet.stats.Stats/FetchPrice
./grpcurl -plaintext -H 'authorization:2bd806c9' -H 'membership:premium' -d '{"include_balance_per_address": true}' xds:///wallet.grpcwallet.io grpc.examples.wallet.Wallet/FetchBalance
您會看到下列結果:
grpc.examples.wallet.account.Account
grpc.health.v1.Health
grpc.reflection.v1alpha.ServerReflection

{
  "name": "Alice",
  "membership": "PREMIUM"
}

{
  "price": "10295"
}

{
  "balance": "5089953"
}
使用「grpc-wallet」用戶端驗證
請按照下列語言專屬的操作說明驗證設定。 這些指令會傳送多個 RPC,其中有些 RPC 含有額外中繼資料,用來顯示系統會根據網址對應中的相符規則,將要求轉送至後端服務。此外,這項指令也會為每個回應列印 VM 執行個體的主機名稱,顯示要求傳送至哪個 VM 執行個體。
Java
如要使用 gRPC Java 用戶端驗證服務,請執行下列指令:
sudo apt-get install -y openjdk-11-jdk-headless
執行下列指令:
cd ~/traffic-director-grpc-examples/java
./gradlew installDist

# This command calls 'FetchBalance' from 'wallet-service' in a loop,
# to demonstrate that 'FetchBalance' gets responses from 'wallet-v1' (70%)
# and 'wallet-v2' (30%).
./build/install/wallet/bin/client balance --wallet_server="xds:///wallet.grpcwallet.io" --unary_watch=true --user=Bob

# This command calls the streaming RPC 'WatchBalance' from 'wallet-service'.
# The RPC path matches the service prefix, so all requests are
# sent to 'wallet-v2'.
./build/install/wallet/bin/client balance --wallet_server="xds:///wallet.grpcwallet.io" --watch=true --user=Bob

# This command calls 'WatchPrice' from 'stats-service'. It sends the
# user's membership (premium or not) in metadata. Premium requests are
# all sent to 'stats-premium' and get faster responses. Alice's requests
# always go to premium and Bob's go to regular.
./build/install/wallet/bin/client price --stats_server="xds:///stats.grpcwallet.io" --watch=true --user=Bob
./build/install/wallet/bin/client price --stats_server="xds:///stats.grpcwallet.io" --watch=true --user=Alice
Go
如要使用 gRPC Go 用戶端驗證服務,請安裝 golang 或按照官方操作說明進行:
sudo apt-get install -y wget
wget https://dl.google.com/go/go1.16.5.linux-amd64.tar.gz
sudo tar -C /usr/local -xvf go1.16.5.linux-amd64.tar.gz
sudo ln -s /usr/local/go/bin/go /usr/bin/go
執行下列指令:
cd ~/traffic-director-grpc-examples/go/wallet_client
go build

# This command calls 'FetchBalance' from 'wallet-service' in a loop,
# to demonstrate that 'FetchBalance' gets responses from 'wallet-v1' (70%)
# and 'wallet-v2' (30%).
./wallet_client balance --wallet_server="xds:///wallet.grpcwallet.io" --unary_watch --user=Bob

# This command calls the streaming RPC 'WatchBalance' from 'wallet-service'.
# The RPC path matches the service prefix, so all requests
# are sent to 'wallet-v2'.
./wallet_client balance --wallet_server="xds:///wallet.grpcwallet.io" --watch --user=Bob

# This command calls 'WatchPrice' from 'stats-service'. It sends the
# user's membership (premium or not) in metadata. Premium requests are
# all sent to 'stats-premium' and get faster responses. Alice's requests
# always go to premium and Bob's go to regular.
./wallet_client price --stats_server="xds:///stats.grpcwallet.io" --watch --user=Bob
./wallet_client price --stats_server="xds:///stats.grpcwallet.io" --watch --user=Alice
C++
如要使用 gRPC C++ 用戶端驗證服務,請執行下列指令:
sudo apt-get install -y build-essential
執行下列指令:
cd ~/traffic-director-grpc-examples/cpp
../tools/bazel build :client

# This command calls 'FetchBalance' from 'wallet-service' in a loop,
# to demonstrate that 'FetchBalance' gets responses from 'wallet-v1' (70%)
# and 'wallet-v2' (30%).
../bazel-bin/cpp/client balance --wallet_server="xds:///wallet.grpcwallet.io" --unary_watch=true --user=Bob

# This command calls the streaming RPC 'WatchBalance'  from 'wallet-service'.
# The RPC path matches the service prefix, so all requests are sent to 'wallet-v2'.
../bazel-bin/cpp/client balance --wallet_server="xds:///wallet.grpcwallet.io" --watch=true --user=Bob

# This command calls 'WatchPrice' from 'stats-service'. It sends the
# user's membership (premium or not) in metadata. Premium requests are
# all sent to 'stats-premium' and get faster responses. Alice's requests
# always go to premium, and Bob's go to regular.
../bazel-bin/cpp/client price --stats_server="xds:///stats.grpcwallet.io" --watch=true --user=Bob
../bazel-bin/cpp/client price --stats_server="xds:///stats.grpcwallet.io" --watch=true --user=Alice
設定更多進階選項
如要設定其他進階流量轉送選項,請按照下列章節的說明操作。
斷路機制
斷路機制可讓您設定失敗門檻,避免用戶端要求造成後端服務過載。當未處理的要求數量達到您設定的上限後,用戶端就會停止傳送額外要求,讓後端服務有時間復原。
斷路機制會向用戶端傳回錯誤,而非讓後端服務超載,藉此避免連鎖故障。這樣一來,系統就能在您管理過載情況時 (例如透過自動調度資源增加容量,以處理流量尖峰),繼續放送部分流量。
為 stats-service 建立後端服務時,create_service.sh 指令碼的設定會包含下列幾行:
circuitBreakers:
  maxRequests: 1
這項設定會限制用戶端一次只能向 stats-service 提出一項待處理要求。由於只有一個 wallet-v2 服務,因此執行兩個並行的錢包用戶端 WatchBalance 作業時,第二個執行個體會發生失敗情形。
Java
執行下列指令:
cd ~/traffic-director-grpc-examples/java
./build/install/wallet/bin/client balance --wallet_server="xds:///wallet.grpcwallet.io" --watch=true --user=Bob  2>/dev/null 1>/dev/null &

sleep 10 # Wait a few seconds to allow the watch to begin.

./build/install/wallet/bin/client balance --wallet_server="xds:///wallet.grpcwallet.io" --watch=true --user=Bob
輸出內容如下:
io.grpc.examples.wallet.Client run
INFO: Will try to run balance
io.grpc.examples.wallet.Client run
WARNING: RPC failed: Status{code=INTERNAL, description=RPC to stats server failed: UNAVAILABLE: Cluster max concurrent requests limit exceeded, cause=null}
發出
kill指令:kill %%
Go
執行下列指令:
cd ~/traffic-director-grpc-examples/go/wallet_client
./wallet_client balance --wallet_server="xds:///wallet.grpcwallet.io" --watch --user=Bob 2> /dev/null 1> /dev/null &

sleep 10 # Wait a few seconds to allow the watch to begin.

./wallet_client balance --wallet_server="xds:///wallet.grpcwallet.io" --watch --user=Bob
輸出內容如下:
server host: error: no hostname
failed to fetch balance: rpc error: code = Internal desc = RPC to stats server failed:
UNAVAILABLE: Cluster max concurrent requests limit exceeded
發出
kill指令:kill %%
C++
執行下列指令:
cd ~/traffic-director-grpc-examples/cpp
../bazel-bin/cpp/client balance --wallet_server="xds:///wallet.grpcwallet.io" --watch=true --user=Bob 2>/dev/null 1>/dev/null &

sleep 10 # Wait a few seconds to allow the watch to begin.

../bazel-bin/cpp/client balance --wallet_server="xds:///wallet.grpcwallet.io" --watch=true --user=Bob
輸出內容如下:
Client arguments: command: balance, wallet_server: xds:///wallet.grpcwallet.io, stats_server:
localhost:18882, user: Bob, watch: 1 ,unary_watch: 0, observability_project: , route:
13: RPC to stats server failed: UNAVAILABLE: Cluster max concurrent requests limit exceeded
發出
kill指令:kill %%
錯誤植入
錯誤植入會在處理要求時產生錯誤,模擬故障情況,包括高延遲、服務超載、服務故障和網路分區。這項功能可用於測試服務對模擬故障的彈性。
先前建立網址對應時,您已將故障注入政策設為使用 route=fault 標頭,導致傳送至 wallet.grpcwallet.io 的 RPC 有 50% 會失敗。
如要示範錯誤注入,請使用下列語言的程式碼。
Java
執行下列指令:
cd ~/traffic-director-grpc-examples/java
./build/install/wallet/bin/client balance --wallet_server="xds:///wallet.grpcwallet.io" --unary_watch=true --user=Bob --route=fault
輸出內容如下:
server host: grpcwallet-wallet-v2-mig-us-central1-zznc
total balance: 10340491
- address: 148de9c5, balance: 2549839
- address: 2e7d2c03, balance: 7790652
io.grpc.examples.wallet.Client run
WARNING: RPC failed: Status{code=UNAVAILABLE, description=RPC terminated due to fault injection: HTTP status code 503, cause=null}
Go
執行下列指令:
cd ~/traffic-director-grpc-examples/go/wallet_client
./wallet_client balance --wallet_server="xds:///wallet.grpcwallet.io" --unary_watch --user=Bob --route=fault
輸出內容如下:
 server host: grpcwallet-wallet-v1-mig-us-central1-bm1t_wallet-v1
 user: Bob, total grpc-coin balance: 10452589.
  - address: 2e7d2c03, balance: 7875108.
  - address: 148de9c5, balance: 2577481.
 failed to fetch balance: rpc error: code = Unavailable desc = RPC terminated due to fault injection
C++
執行下列指令:
cd ~/traffic-director-grpc-examples/cpp
../bazel-bin/cpp/client balance --wallet_server="xds:///wallet.grpcwallet.io" --unary_watch=true --user=Bob --route=fault
輸出內容如下:
Client arguments: command: balance, wallet_server: xds:///wallet.grpcwallet.io,
stats_server: localhost:18882, user: Bob, watch: 0 ,unary_watch: 1, observability_project: ,
route: fault server host: grpcwallet-wallet-v2-mig-us-central1-1lm6
user: Bob total grpc-coin balance: 10211908
 - address: 148de9c5, balance: 2518132
 - address: 2e7d2c03, balance: 7693776
14: Fault injected
最長串流時間
串流時間長度上限可讓所有 RPC 套用逾時上限。這樣一來,忘記設定期限或設定過長期限的用戶端,就不會浪費伺服器資源。
先前建立網址對應時,您已為傳送至 wallet.grpcwallet.io 的 RPC 設定 5 秒的最大串流時間,並使用 route=timeout 標頭。
如要示範逾時,請先停止 wallet-v2 服務。
gcloud
gcloud compute instance-groups managed resize \
    --size=0 grpcwallet-wallet-v2-mig-us-central1 \
    --zone=us-central1-a
下列指令會永遠停滯,因為沒有後端服務可處理該指令,且應用程式未設定期限。
Java
執行下列指令:
cd ~/traffic-director-grpc-examples/java
./build/install/wallet/bin/client balance --wallet_server="xds:///wallet.grpcwallet.io" --watch=true --user=Bob
指令停止回應。按下 ^C 鍵即可中斷指令。
Go
執行下列指令:
cd ~/traffic-director-grpc-examples/go/wallet_client
./wallet_client balance --wallet_server="xds:///wallet.grpcwallet.io" --watch --user=Bob
指令停止回應。按下 ^C 鍵即可中斷指令。
C++
執行下列指令:
cd ~/traffic-director-grpc-examples/cpp
../bazel-bin/cpp/client balance --wallet_server="xds:///wallet.grpcwallet.io" --watch=true --user=Bob
指令停止回應。按下 ^C 鍵即可中斷指令。
不過,由於 maxStreamDuration 設定,使用 timeout 路徑的下列指令會在 5 秒後失敗。
Java
執行下列指令:
cd ~/traffic-director-grpc-examples/java
./build/install/wallet/bin/client balance --wallet_server="xds:///wallet.grpcwallet.io" --watch=true --user=Bob --route=timeout
輸出內容如下:
io.grpc.examples.wallet.Client run
WARNING: RPC failed: Status{code=DEADLINE_EXCEEDED, description=deadline exceeded after 4.999594070s.         [wait_for_ready, buffered_nanos=5000553401, waiting_for_connection], cause=null}
Go
執行下列指令:
cd ~/traffic-director-grpc-examples/go/wallet_client
./wallet_client balance --wallet_server="xds:///wallet.grpcwallet.io" --watch --user=Bob --route=timeout
輸出內容如下:
failed to create stream: rpc error: code = DeadlineExceeded desc = context deadline exceeded.
C++
執行下列指令:
cd ~/traffic-director-grpc-examples/cpp
../bazel-bin/cpp/client balance --wallet_server="xds:///wallet.grpcwallet.io" --watch=true --user=Bob --route=timeout
輸出內容如下:
Client arguments: command: balance, wallet_server: xds:///wallet.grpcwallet.io, stats_server:
localhost:18882, user: Bob, watch: 1 ,unary_watch: 0, observability_project: , route: timeout
4: Deadline Exceeded
重新啟動 wallet-v2 服務。
gcloud
gcloud compute instance-groups managed resize \
    --size=1 grpcwallet-wallet-v2-mig-us-central1 \
    --zone=us-central1-a
重試
重試功能可讓 gRPC 應用程式根據重試政策重試外送要求,有助於提高服務可用性。在重試政策中,您可以設定重試失敗要求的條件和重試次數上限,例如要求失敗並傳回特定回應代碼時。
先前建立網址對應時,您已透過 membership=premium 標頭,為 FetchBalance 方法設定 RPC 的重試政策。這項政策會重試狀態碼為 unavailable 的 RPC,最多重試 3 次。您也可以為 RPC 設定故障注入政策,以 account.grpcwallet.io 標頭將 Wallet 服務傳送至 Account 服務的 RPC 失敗率設為 30%。route=account-fault因此,來自測試用戶端且含有 membership=normal 標頭的 RPC 有 30% 會失敗,而含有 membership=premium 標頭的 RPC 失敗率則低於 1%。
如要示範重試,請使用下列語言的程式碼。
Java
執行下列指令:
cd ~/traffic-director-grpc-examples/java
# 30% of the requests fail because Bob is a normal user.
./build/install/wallet/bin/client balance --wallet_server="xds:///wallet.grpcwallet.io" --unary_watch=true --user=Bob --route=account-fault
# Less than 1% of the requests fail because Alice is a premium user.
./build/install/wallet/bin/client balance --wallet_server="xds:///wallet.grpcwallet.io" --unary_watch=true --user=Alice --route=account-fault
Go
執行下列指令:
cd ~/traffic-director-grpc-examples/go/wallet_client
# 30% of the requests fail because Bob is a normal user.
./wallet_client balance --wallet_server="xds:///wallet.grpcwallet.io" --unary_watch=true --user=Bob --route=account-fault
# Less than 1% of the requests fail because Alice is a premium user.
./wallet_client balance --wallet_server="xds:///wallet.grpcwallet.io" --unary_watch=true --user=Alice --route=account-fault
C++
執行下列指令:
cd ~/traffic-director-grpc-examples/cpp
# 30% of the requests fail because Bob is a normal user.
../bazel-bin/cpp/client balance --wallet_server="xds:///wallet.grpcwallet.io" --unary_watch=true --user=Bob --route=account-fault
# Less than 1% of the requests fail because Alice is a premium user.
../bazel-bin/cpp/client balance --wallet_server="xds:///wallet.grpcwallet.io" --unary_watch=true --user=Alice --route=account-fault
工作階段相依性
工作階段相依性會盡可能將具有特定特徵 (HTTP 標頭) 的要求傳送至同一個執行個體,只要該執行個體保持良好健康狀態並具有容量即可。對於有狀態的應用程式伺服器而言,如果來自特定用戶端的要求傳送至同一個執行個體,而不是以輪詢方式分配至不同執行個體,效能和效率都會提升,因此這項功能非常實用。
建立後端服務 grpcwallet-wallet-v1-affinity-service 時,create_service.sh 指令碼中的 localityLbPolicy 會設為 ROUND_ROBIN。在本範例中,您將套用下列設定,將 localityLbPolicy 變更為 RING_HASH。
sessionAffinity: HEADER_FIELD
localityLbPolicy: RING_HASH
consistentHash:
  httpHeaderName: "session_id"
gcloud
儲存後端服務的設定
grpcwallet-wallet-v1-affinity-service:gcloud compute backend-services export grpcwallet-wallet-v1-affinity-service \ --destination=bs_config.yaml \ --global
更新後端服務
grpcwallet-wallet-v1-affinity-service:project_id="$(gcloud config list --format 'value(core.project)')" backend_config=" backends: - balancingMode: UTILIZATION capacityScaler: 1.0 group: projects/${project_id}/zones/us-central1-a/instanceGroups/grpcwallet-wallet-v1-mig-us-central1 connectionDraining: drainingTimeoutSec: 0 healthChecks: - projects/${project_id}/global/healthChecks/grpcwallet-health-check loadBalancingScheme: INTERNAL_SELF_MANAGED name: grpcwallet-wallet-v1-affinity-service portName: grpcwallet-wallet-port protocol: GRPC sessionAffinity: HEADER_FIELD localityLbPolicy: RING_HASH consistentHash: httpHeaderName: session_id" gcloud compute backend-services import grpcwallet-wallet-v1-affinity-service --global <<< "${backend_config}"
如要示範工作階段相依性,請使用下列語言的程式碼。使用 --affinity=true 標記時,用戶端會為每位使用者插入含有專屬值的 session-id 標頭。系統會使用這個值的雜湊,將要求傳送至後端服務 grpcwallet-wallet-v1-affinity-service 執行個體群組中的特定執行個體。
Java
執行下列指令:
cd ~/traffic-director-grpc-examples/java
# Without affinity, requests are sent to both instances.
./build/install/wallet/bin/client balance --wallet_server="xds:///wallet.grpcwallet.io" --unary_watch=true --user=Alice
# With affinity, requests are sent to only one instance.
./build/install/wallet/bin/client balance --wallet_server="xds:///wallet.grpcwallet.io" --unary_watch=true --user=Alice --affinity=true
Go
執行下列指令:
cd ~/traffic-director-grpc-examples/go/wallet_client
# Without affinity, requests are sent to both instances.
./wallet_client balance --wallet_server="xds:///wallet.grpcwallet.io" --unary_watch=true --user=Alice
# With affinity, requests are sent to only one instance.
./wallet_client balance --wallet_server="xds:///wallet.grpcwallet.io" --unary_watch=true --user=Alice --affinity=true
C++
執行下列指令:
cd ~/traffic-director-grpc-examples/cpp
# Without affinity, requests are sent to both instances.
../bazel-bin/cpp/client balance --wallet_server="xds:///wallet.grpcwallet.io" --unary_watch=true --user=Alice
# With affinity, requests are sent to only one instance.
../bazel-bin/cpp/client balance --wallet_server="xds:///wallet.grpcwallet.io" --unary_watch=true --user=Alice --affinity=true
還原後端服務 grpcwallet-wallet-v1-affinity-service 的設定。
gcloud
gcloud compute backend-services import grpcwallet-wallet-v1-affinity-service \
  --source=bs_config.yaml \
  --global
離群值偵測
如要提高服務可用性,請設定離群值偵測功能。這項功能可讓您找出健康狀態不良的主機,並暫時從負載平衡集區中移除。這些不正常的主機稱為離群值。
gRPC 會根據成功率評估主機,也就是主機成功處理要求的頻率。gRPC 錯誤、HTTP 錯誤、逾時和其他問題等失敗情況都會影響這個比率。
透過 Cloud Service Mesh 設定離群值偵測功能時,您可以微調 gRPC 評估主機的方式,以及處理離群值的方式。舉例來說,您可以指定下列條件:
主機必須收到的要求數量,gRPC 才會分析要求是否可能為離群值。
主機可偏離平均成功率的程度,超過此程度即視為異常。
可從負載平衡集區排除的主機百分比上限。
從負載平衡集區排除離群值的時間長度。
如要進一步瞭解可用參數,請參閱 REST Resource: backendServices 參考資料。不過,gRPC 有一些限制,詳情請參閱下一節。
限制
gRPC 用戶端不支援下列欄位:
outlierDetection.consecutiveErrorsoutlierDetection.enforcingConsecutiveErrorsoutlierDetection.consecutiveGatewayFailureoutlierDetection.enforcingConsecutiveGatewayFailure
設定離群值偵測
下列程序說明如何為使用一個執行個體群組做為後端的服務,設定離群值偵測功能。這項程序會建立下列設定:
- 離群值偵測分析每秒都會執行一次。您可以使用
interval欄位設定這項行為。 - 系統會以 30 秒為間隔,將離群值從負載平衡集區中排除,如下所示:
- 如果主機先前從未遭到驅逐,則只會被驅逐 30 秒。
- 如果主辦人先前曾遭驅逐,每次遭驅逐都會增加 30 秒。舉例來說,如果主機第三次遭到排除,排除時間為 90 秒。您可以使用
baseEjectionTime欄位設定這項行為。
- 如果主機在所選時間間隔 (在本例中為 1 秒) 內的成功率低於平均值一個標準差,就會視為不健康。您可以使用
successRateStdevFactor欄位設定最大標準差。
如要透過這種方式設定離群值偵測功能,請按照下列步驟操作。
gcloud
使用
gcloud compute backend-services export指令匯出grpcwallet-wallet-v2-service後端服務設定檔:gcloud compute backend-services export grpcwallet-wallet-v2-service \ --destination=bs_config.yaml \ --global
在
bs_config.yaml檔案中,更新grpcwallet-wallet-v2-service設定,加入離群值偵測欄位:outlierDetection: interval: seconds: 1 nanos: 0 baseEjectionTime: seconds: 30 nanos: 0 successRateStdevFactor: 1000
使用
gcloud compute backend-services import指令匯入更新的檔案:gcloud compute backend-services import grpcwallet-wallet-v2-service \ --source=bs_config.yaml \ --global
地區負載平衡
如要盡量有效運用資源,請設定區域負載平衡。這項功能可將用戶端要求平均分配至後端,協助您節省資源。
設定區域性負載平衡時,可以使用下表所述的選項。所有選項都必須設定 backendServices 資源。
| 選項 | 適用的裝置 | 相關設定欄位 |
|---|---|---|
| 使用內建政策 | 所有 gRPC 用戶端 | localityLbPolicy |
| 使用自訂政策 | 使用 gRPC 1.47 以上版本的 Java 用戶端,位於僅含 gRPC 用戶端的網格中 | localityLbPolicies
|
| 定義偏好政策清單 | 使用 gRPC 1.47 以上版本的 Java 用戶端,位於僅含 gRPC 用戶端的網格中 | localityLbPolicies |
您可以任意搭配使用上述選項。不過,如果您同時設定 localityLbPolicy 和 localityLbPolicies,gRPC 會先嘗試使用 localityLbPolicies 設定。
如未設定區域負載平衡,Cloud Service Mesh 會使用 ROUND_ROBIN 政策。
如要瞭解 ROUND_ROBIN 和其他內建政策,請參閱「backendServices」頁面上的 localityLbPolicy 說明。
使用內建政策
如要讓所有用戶端使用單一內建政策,請設定 localityLbPolicy 欄位來選取該政策。
設定這個欄位時,您可以選擇下列政策:
LEAST_REQUEST(僅限 Java 用戶端)RING_HASHROUND_ROBIN
如果並非所有用戶端都能使用相同政策,請參閱「定義偏好政策清單」。
gcloud
使用
gcloud compute backend-services export指令匯出grpcwallet-wallet-v2-service後端服務設定檔:gcloud compute backend-services export grpcwallet-wallet-v2-service \ --destination=bs_config.yaml \ --global
更新匯出的
bs_config.yaml檔案,加入以下程式碼:localityLbPolicy: -- policy name: RING_HASH使用 gcloud compute backend-services import 指令匯入更新後的檔案:
gcloud compute backend-services import grpcwallet-wallet-v2-service --source=bs_config.yaml --global
使用自訂政策
如果合適,您可以使用透過 gRPC 建立及部署的自訂負載平衡政策。這項功能適用於使用 gRPC 1.47 以上版本的 Java 用戶端。請僅在包含所有 gRPC 用戶端的網格中使用。
建立自訂政策時,下列文件或許有幫助:
如要進一步自訂政策,可以使用 Open Request Cost Aggregation (ORCA) API。這些 API 可讓您擷取查詢費用和伺服器使用率的指標。使用這些 API 時,必須安裝 gRPC 1.48.1 以上版本。詳情請參閱 gRPC ORCA 範例。
如要瞭解 xDS 如何將自訂負載平衡設定傳送至 gRPC,請參閱「gRPC xDS 自訂負載平衡器設定」。
如要將 Cloud Service Mesh 設定為使用自訂政策,請使用 localityLbPolicies 欄位找出政策。
以下步驟說明這個程序。在本程序中,您會更新 grpcwallet-wallet-v2-service 後端服務的設定,讓連線至該服務的用戶端使用名為 example.ExampleLoadBalancer 的自訂政策。
gcloud
使用
gcloud compute backend-services export指令匯出grpcwallet-wallet-v2-service後端服務設定檔:gcloud compute backend-services export grpcwallet-wallet-v2-service \ --destination=bs_config.yaml \ --global
更新匯出的
bs_config.yaml檔案,以參照example.ExampleLoadBalancer政策。加入下列幾行:localityLbPolicies: - customPolicy: name: example.ExampleLoadBalancer data: '{ "message": "Hello load-balancing world!" }'使用 gcloud compute backend-services import 指令匯入更新後的檔案:
gcloud compute backend-services import grpcwallet-wallet-v2-service --source=bs_config.yaml --global
選用:測試負載平衡設定:
Java
cd ~/traffic-director-grpc-examples/java ./build/install/wallet/bin/client balance --wallet_server="xds:///wallet.grpcwallet.io" --watch=true --user=Bob
如果自訂負載平衡政策設定正確,您會看到設定中加入的訊息 (「Hello load-balancing world!」)。
定義偏好的政策清單
如果您有多個用戶端,但並非所有用戶端都支援單一負載平衡政策,請建立用戶端可使用的政策清單。如果採用這個選項,當特定用戶端無法使用第一個偏好政策時,gRPC 會改用清單中的下一個政策。
建立偏好政策清單時,有效選項包括自訂政策,以及 Java 用戶端的 ROUND_ROBIN。最多可列出 10 項政策。
這項功能僅適用於使用 gRPC 1.47 以上版本的 Java 用戶端。請僅在包含所有 gRPC 用戶端的網格中使用。
gcloud
- 使用
gcloud compute backend-services export指令匯出grpcwallet-wallet-v2-service後端服務設定檔:
gcloud compute backend-services export grpcwallet-wallet-v2-service \
 --destination=bs_config.yaml \
 --global
更新匯出的
bs_config.yaml檔案,加入localityLbPolicies欄位。填入代表下列政策的項目:- 無效的自訂政策 (
example.InvalidLoadBalancer) - 有效的自訂政策 (
example.ExampleLoadBalancer) - 支援的內建政策 (
LEAST_REQUEST)
localityLbPolicies: - customPolicy: name: example.InvalidLoadBalancer data: '{ "message": "This load-balancing policy doesn't work!" }' - customPolicy: name: example.ExampleLoadBalancer data: '{ "message": "Hello load-balancing world!" }' - policy: name: LEAST_REQUEST- 無效的自訂政策 (
使用 gcloud compute backend-services import 指令匯入更新後的檔案:
gcloud compute backend-services import grpcwallet-wallet-v2-service --source=bs_config.yaml --global
選用:測試負載平衡設定:
Java
cd ~/traffic-director-grpc-examples/java
./build/install/wallet/bin/client balance --wallet_server="xds:///wallet.grpcwallet.io" --watch=true --user=Bob
在回應中,gRPC 嘗試尋找
example.InvalidLoadBalancer,但失敗了。之後,系統會改用example.ExampleLoadBalancer,並顯示您在設定中加入的訊息 (「Hello load-balancing world!」)。用戶端上的 gRPC 記錄包含一則訊息,指出找不到example.InvalidLoadBalancer。
清理資源
如要清理資源,請在本機系統中執行下列指令:
traffic-director-grpc-examples/scripts/cleanup.sh
封鎖服務之間的流量
如要封鎖服務 A 和服務 B 之間的流量,且部署作業是在 GKE 上進行,請設定服務安全機制,並使用授權政策封鎖服務之間的流量。如需完整操作說明,請參閱「Cloud Service Mesh 服務安全性」一文,以及 Envoy 和無 Proxy gRPC 的設定說明。
後續步驟
- 如要解決 Cloud Service Mesh 設定問題,請參閱「解決無 Proxy gRPC 部署項目的問題」。