


本部署作業說明如何將 Cloud Service Mesh 與 Cloud Load Balancing 結合,向網際網路用戶公開發布服務網格中的應用程式。
視用戶端所在位置而定,您可以使用多種方式向用戶端公開應用程式。本部署作業說明如何結合 Cloud Load Balancing 和 Cloud Service Mesh,將負載平衡器與服務網格整合,向用戶端公開應用程式。本部署作業適用於執行 Cloud Service Mesh 的進階實務人員,但也能用於 Google Kubernetes Engine 上的 Istio。
架構
下圖顯示如何使用網格 Ingress 閘道,將負載平衡器與服務網格整合:
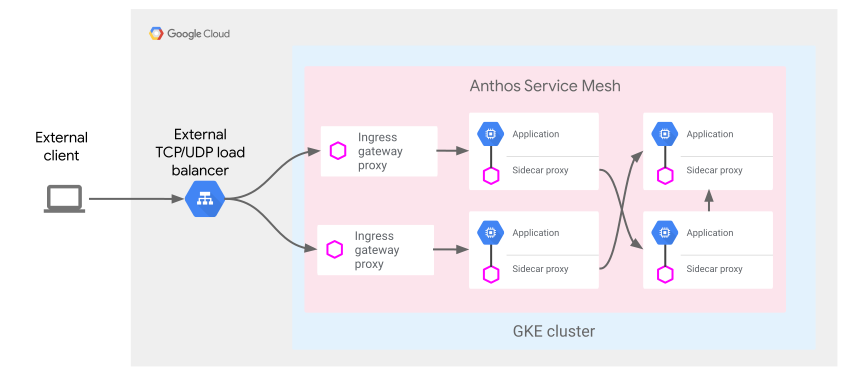
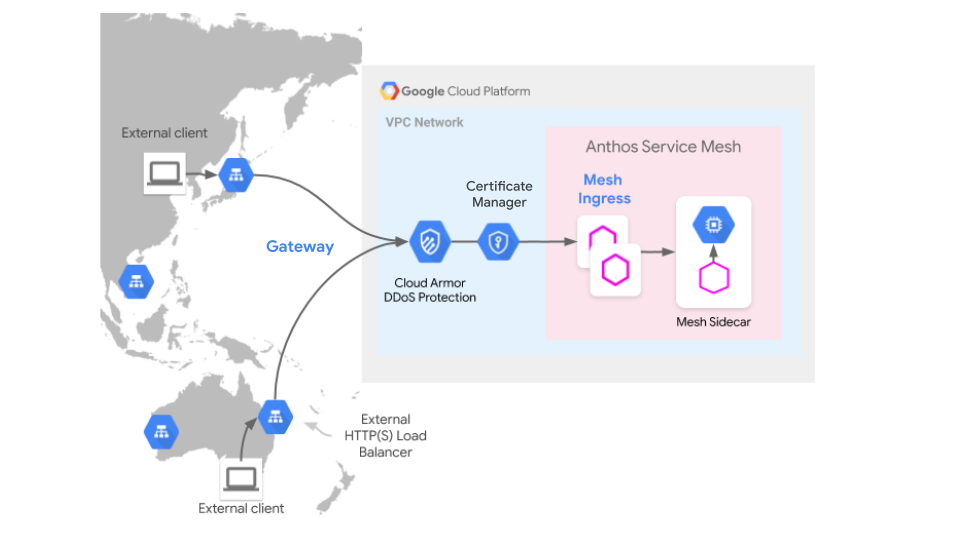
在上圖的拓撲中,雲端進入層 (透過 GKE Gateway 編程) 會從服務網格外部取得流量,並將該流量導向網格進入層。網格輸入層接著會將流量導向網格代管的應用程式後端。
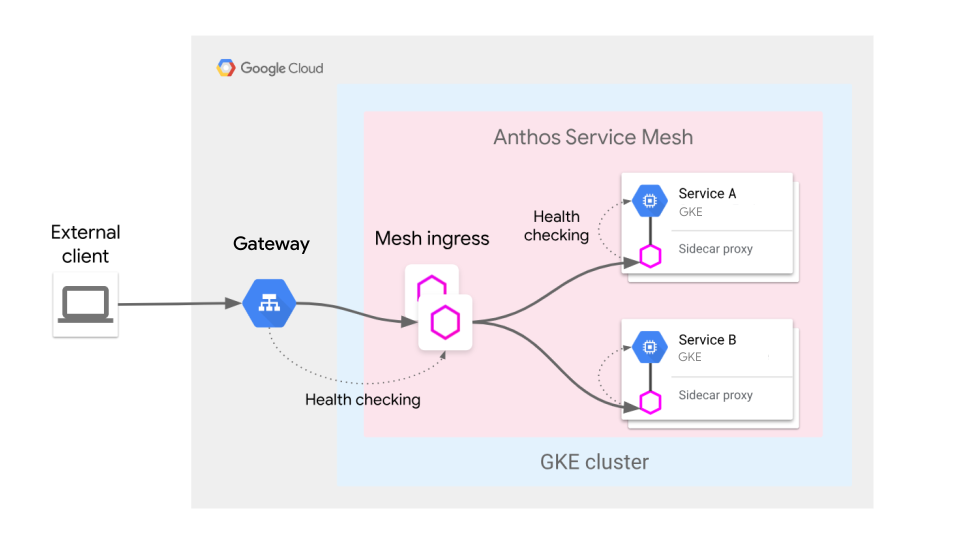
上述拓撲有下列注意事項:
- Cloud Ingress:在本參考架構中,您會透過 GKE Gateway 設定Google Cloud 負載平衡器,檢查網格 Ingress Proxy 暴露的健康狀態檢查通訊埠。
- 網格輸入:在網格應用程式中,您可以直接對後端執行健康狀態檢查,以便在本機執行負載平衡和流量管理。
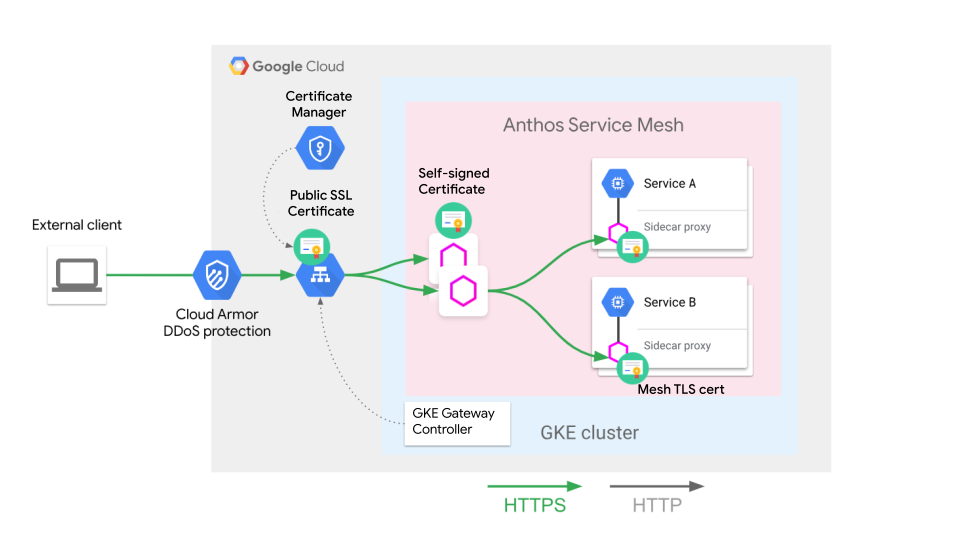
上圖說明從用戶端到 Google Cloud 負載平衡器、從負載平衡器到網格 Ingress Proxy,以及從 Ingress Proxy 到 Sidecar Proxy 的 HTTPS 加密程序。
目標
- 在 Google Cloud上部署 Google Kubernetes Engine (GKE) 叢集。
- 在 GKE 叢集上部署以 Istio 為基礎的 Cloud Service Mesh。
- 設定 GKE Gateway 終止公開 HTTPS 流量,並將該流量導向服務網格代管的應用程式。
- 在 GKE 叢集上部署 Online Boutique 應用程式,並向網際網路上的用戶端公開。
成本最佳化
在本文件中,您會使用下列 Google Cloud的計費元件:
- Google Kubernetes Engine
- Compute Engine
- Cloud Load Balancing
- Certificate Manager
- Cloud Service Mesh
- Google Cloud Armor
- Cloud Endpoints
如要根據預測用量估算費用,請使用 Pricing Calculator。
完成本文所述工作後,您可以刪除建立的資源,避免繼續計費,詳情請參閱「清除所用資源」。
事前準備
-
在 Google Cloud 控制台的專案選擇器頁面中,選取或建立 Google Cloud 專案。
選取或建立專案所需的角色
- 選取專案:選取專案時,不需要具備特定 IAM 角色,只要您在專案中獲派角色,即可選取該專案。
-
建立專案:如要建立專案,您需要具備專案建立者角色 (
roles/resourcemanager.projectCreator),其中包含resourcemanager.projects.create權限。瞭解如何授予角色。
-
在 Google Cloud 控制台中啟用 Cloud Shell。
您將透過 Cloud Shell 執行這項部署作業的所有終端機指令。
升級至最新版 Google Cloud CLI:
gcloud components update設定預設 Google Cloud 專案:
export PROJECT=PROJECT
export PROJECT_NUMBER=$(gcloud projects describe ${PROJECT} --format="value(projectNumber)")
gcloud config set project ${PROJECT}
將
PROJECT替換為您要用於這項部署作業的專案 ID。建立工作目錄:
mkdir -p ${HOME}/edge-to-mesh
cd ${HOME}/edge-to-mesh
export WORKDIR=`pwd`
完成部署後,您可以刪除工作目錄。
建立 GKE 叢集
本部署作業所述功能需要 GKE 叢集 1.30 以上版本。
在 Cloud Shell 中,建立新的
kubeconfig檔案。這個步驟可確保您不會與現有的 (預設)kubeconfig檔案發生衝突。touch edge2mesh_kubeconfig export KUBECONFIG=${WORKDIR}/edge2mesh_kubeconfig定義 GKE 叢集的環境變數:
export CLUSTER_NAME=edge-to-mesh
export CLUSTER_LOCATION=us-central1
啟用 Kubernetes Engine API:
gcloud services enable container.googleapis.com建立 GKE Autopilot 叢集:
gcloud container --project ${PROJECT} clusters create-auto \
${CLUSTER_NAME} --region ${CLUSTER_LOCATION} --release-channel rapid
確認叢集正在執行:
gcloud container clusters list輸出結果會與下列內容相似:
NAME          LOCATION    MASTER_VERSION    MASTER_IP      MACHINE_TYPE   NODE_VERSION      NUM_NODES  STATUS
edge-to-mesh  us-central1  1.35.3-gke.1993000   34.122.84.52  e2-medium  1.35.3-gke.1993000   3          RUNNING
安裝服務網格
在本節中,您將使用 Fleet API 設定代管 Cloud Service Mesh。
在 Cloud Shell 中,啟用所需的 API:
gcloud services enable mesh.googleapis.com在機群上啟用 Cloud Service Mesh:
gcloud container fleet mesh enable向機群註冊叢集:
gcloud container fleet memberships register ${CLUSTER_NAME} \
  --gke-cluster ${CLUSTER_LOCATION}/${CLUSTER_NAME}
啟用自動控制層管理和代管資料層:
gcloud container fleet mesh update \
  --management automatic \
  --memberships ${CLUSTER_NAME}
幾分鐘後,請確認控制層狀態為
ACTIVE:gcloud container fleet mesh describe輸出結果會與下列內容相似:
...
membershipSpecs:
  projects/129729647315/locations/us-central1/memberships/edge-to-mesh:
  mesh:
    management: MANAGEMENT_AUTOMATIC
membershipStates:
  projects/129729647315/locations/us-central1/memberships/edge-to-mesh:
    servicemesh:
      conditions:
      - code: VPCSC_GA_SUPPORTED
        details: This control plane supports VPC-SC GA.
        documentationLink: http://cloud.google.com/service-mesh/docs/managed/vpc-sc
        severity: INFO
      controlPlaneManagement:
        details:
        - code: REVISION_READY
          details: 'Ready: asm-managed-rapid'
        implementation: TRAFFIC_DIRECTOR
        state: ACTIVE
      dataPlaneManagement:
        details:
        - code: OK
          details: Service is running.
        state: ACTIVE
    state:
      code: OK
      description: |-
        Revision ready for use: asm-managed-rapid.
        All Canonical Services have been reconciled successfully.
      updateTime: '2026-05-29T15:54:42.135357434Z'
name: projects/e2m-api-update-may-26/locations/global/features/servicemesh
resourceState:
  state: ACTIVE
...
部署 GKE 閘道
在下列步驟中,您會透過 GKE Gateway 控制器部署外部應用程式負載平衡器。GKE Gateway 資源會自動佈建負載平衡器和後端健康狀態檢查。此外,您會使用 Certificate Manager 佈建及管理 TLS 憑證,並使用端點自動佈建應用程式的公開 DNS 名稱。
安裝服務網格 Ingress 閘道
為確保安全,建議您在控制層以外的命名空間中部署 Ingress 閘道。
在 Cloud Shell 中建立專屬的
ingress-gateway命名空間:kubectl create namespace ingress-gateway將命名空間標籤新增至
ingress-gateway命名空間:kubectl label namespace ingress-gateway istio-injection=enabled輸出結果會與下列內容相似:
namespace/ingress-gateway labeled
使用
istio-injection=enabled標記ingress-gateway命名空間,即可指示 Cloud Service Mesh 在部署應用程式時,自動插入 Envoy 補充資訊 Proxy。建立 Ingress 閘道使用的自行簽署憑證,終止 Google Cloud 負載平衡器 (稍後透過 GKE Gateway 控制器設定) 和 Ingress 閘道之間的 TLS 連線,並將自行簽署憑證儲存為 Kubernetes 密鑰:
openssl req -new -newkey rsa:4096 -days 365 -nodes -x509 \ -subj "/CN=frontend.endpoints.${PROJECT}.cloud.goog/O=Edge2Mesh Inc" \ -keyout frontend.endpoints.${PROJECT}.cloud.goog.key \ -out frontend.endpoints.${PROJECT}.cloud.goog.crt kubectl -n ingress-gateway create secret tls edge2mesh-credential \ --key=frontend.endpoints.${PROJECT}.cloud.goog.key \ --cert=frontend.endpoints.${PROJECT}.cloud.goog.crt如要進一步瞭解輸入閘道憑證的規定,請參閱安全後端通訊協定注意事項指南。
如要為 GFE 對網格連線使用 HTTP/2,但不需要自己的加密,則可以使用 H2C。
執行下列指令,建立 Ingress 閘道資源 YAML:
mkdir -p ${WORKDIR}/ingress-gateway/base
cat <<EOF > ${WORKDIR}/ingress-gateway/base/kustomization.yaml
resources:
  - github.com/GoogleCloudPlatform/anthos-service-mesh-samples/docs/ingress-gateway-asm-manifests/base
EOF

mkdir ${WORKDIR}/ingress-gateway/variant
cat <<EOF > ${WORKDIR}/ingress-gateway/variant/role.yaml
apiVersion: rbac.authorization.k8s.io/v1
kind: Role
metadata:
  name: asm-ingressgateway
rules:
- apiGroups: [""]
  resources: ["secrets"]
  verbs: ["get", "watch", "list"]
EOF

cat <<EOF > ${WORKDIR}/ingress-gateway/variant/rolebinding.yaml
apiVersion: rbac.authorization.k8s.io/v1
kind: RoleBinding
metadata:
  name: asm-ingressgateway
roleRef:
  apiGroup: rbac.authorization.k8s.io
  kind: Role
  name: asm-ingressgateway
subjects:
  - kind: ServiceAccount
    name: asm-ingressgateway
EOF

cat <<EOF > ${WORKDIR}/ingress-gateway/variant/service-proto-type.yaml
apiVersion: v1
kind: Service
metadata:
  name: asm-ingressgateway
spec:
  ports:
  - name: status-port
    port: 15021
    protocol: TCP
    targetPort: 15021
  - name: http
    port: 80
    targetPort: 8080
  - name: https
    port: 443
    targetPort: 8443
    appProtocol: HTTP2
  type: ClusterIP
EOF

cat <<EOF > ${WORKDIR}/ingress-gateway/variant/gateway.yaml
apiVersion: networking.istio.io/v1beta1
kind: Gateway
metadata:
  name: asm-ingressgateway
spec:
  servers:
  - port:
      number: 443
      name: https
      protocol: HTTPS
    hosts:
    - "*" # IMPORTANT: Must use wildcard here when using SSL, as SNI isn't passed from GFE
    tls:
      mode: SIMPLE
      credentialName: edge2mesh-credential
EOF

cat <<EOF > ${WORKDIR}/ingress-gateway/variant/kustomization.yaml
namespace: ingress-gateway
resources:
- ../base
- role.yaml
- rolebinding.yaml
patches:
- path: service-proto-type.yaml
  target:
    kind: Service
- path: gateway.yaml
  target:
    kind: Gateway
EOF
套用 Ingress 閘道 CRD:
kubectl apply -k ${WORKDIR}/ingress-gateway/variant確認所有部署作業都已啟動並運作中:
kubectl wait --for=condition=available --timeout=600s deployment --all -n ingress-gateway輸出結果會與下列內容相似:
deployment.apps/asm-ingressgateway condition met
套用服務網格 Ingress 閘道健康狀態檢查
將服務網格輸入閘道整合至 Google Cloud 應用程式負載平衡器時,必須將應用程式負載平衡器設定為對輸入閘道 Pod 執行健康狀態檢查。HealthCheckPolicy CRD 提供 API 來設定該健康狀態檢查。
在 Cloud Shell 中建立
HealthCheckPolicy.yaml檔案:cat <<EOF >${WORKDIR}/ingress-gateway-healthcheck.yaml apiVersion: networking.gke.io/v1 kind: HealthCheckPolicy metadata: name: ingress-gateway-healthcheck namespace: ingress-gateway spec: default: checkIntervalSec: 20 timeoutSec: 5 #healthyThreshold: HEALTHY_THRESHOLD #unhealthyThreshold: UNHEALTHY_THRESHOLD logConfig: enabled: True config: type: HTTP httpHealthCheck: #portSpecification: USE_NAMED_PORT port: 15021 portName: status-port #host: HOST requestPath: /healthz/ready #response: RESPONSE #proxyHeader: PROXY_HEADER #requestPath: /healthz/ready #port: 15021 targetRef: group: "" kind: Service name: asm-ingressgateway EOF套用
HealthCheckPolicy:kubectl apply -f ${WORKDIR}/ingress-gateway-healthcheck.yaml
定義安全性政策
Cloud Armor 提供 DDoS 防護和可自訂的安全政策,您可以透過 Ingress 資源將這些政策附加至負載平衡器。在下列步驟中,您將建立安全政策,使用預先設定的規則封鎖跨網站指令碼攻擊 (XSS)。這項規則有助於封鎖符合已知攻擊簽章的流量,但允許所有其他流量。您的環境可能會根據工作負載使用不同的規則。
在 Cloud Shell 中,建立名為
edge-fw-policy的安全性政策:gcloud compute security-policies create edge-fw-policy \ --description "Block XSS attacks"建立使用預先設定 XSS 篩選器的安全性政策規則:
gcloud compute security-policies rules create 1000 \
    --security-policy edge-fw-policy \
    --expression "evaluatePreconfiguredExpr('xss-stable')" \
    --action "deny-403" \
    --description "XSS attack filtering"
建立
GCPBackendPolicy.yaml檔案,附加至 Ingress 閘道服務:cat <<EOF > ${WORKDIR}/cloud-armor-backendpolicy.yaml apiVersion: networking.gke.io/v1 kind: GCPBackendPolicy metadata: name: cloud-armor-backendpolicy namespace: ingress-gateway spec: default: securityPolicy: edge-fw-policy targetRef: group: "" kind: Service name: asm-ingressgateway EOF套用
GCPBackendPolicy.yaml檔案:kubectl apply -f ${WORKDIR}/cloud-armor-backendpolicy.yaml
設定 IP 位址和 DNS
在 Cloud Shell 中,為Google Cloud 負載平衡器建立全域靜態 IP 位址:
gcloud compute addresses create e2m-gclb-ip --global這個靜態 IP 位址由 GKE 閘道資源使用,即使外部負載平衡器變更,IP 位址也不會改變。
取得靜態 IP 位址:
export GCLB_IP=$(gcloud compute addresses describe e2m-gclb-ip \
--global --format "value(address)")
echo ${GCLB_IP}
如要建立穩定且易於使用的對應,將應用程式負載平衡器的靜態 IP 位址對應至網域名稱,您必須擁有公開 DNS 記錄。您可以使用任何 DNS 供應商和自動化工具。這個部署作業會使用 Endpoints,而不是建立代管 DNS 區域。Endpoints 會為公開 IP 位址提供免費的 Google 代管 DNS 記錄。
執行下列指令,建立名為
dns-spec.yaml的 YAML 規格檔案:cat <<EOF > ${WORKDIR}/dns-spec.yaml swagger: "2.0" info: description: "Cloud Endpoints DNS" title: "Cloud Endpoints DNS" version: "1.0.0" paths: {} host: "frontend.endpoints.${PROJECT}.cloud.goog" x-google-endpoints: - name: "frontend.endpoints.${PROJECT}.cloud.goog" target: "${GCLB_IP}" EOFYAML 規格會以
frontend.endpoints.${PROJECT}.cloud.goog形式定義公開 DNS 記錄,其中${PROJECT}是專案的專屬 ID。在 Google Cloud 專案中部署
dns-spec.yaml檔案:gcloud endpoints services deploy ${WORKDIR}/dns-spec.yaml輸出結果會與下列內容相似:
project [e2m-doc-01]...
Operation "operations/acat.p2-892585880385-fb4a01ad-821d-4e22-bfa1-a0df6e0bf589" finished successfully.

Service Configuration [2023-08-04r0] uploaded for service [frontend.endpoints.e2m-doc-01.cloud.goog]
設定 IP 位址和 DNS 後,您就可以產生公開憑證,確保前端安全。如要與 GKE Gateway 整合,請使用 Certificate Manager TLS 憑證。
佈建傳輸層安全標準 (TLS) 憑證
在本節中,您將使用Certificate Manager建立 TLS 憑證,並透過憑證對應關係將其與憑證對應組合建立關聯。透過 GKE Gateway 設定的應用程式負載平衡器會使用憑證,在用戶端和 Google Cloud之間提供安全通訊。建立完成後,GKE Gateway 資源會參照憑證對應關係。
在 Cloud Shell 中啟用 Certificate Manager API:
gcloud services enable certificatemanager.googleapis.com --project=${PROJECT}建立 TLS 憑證:
gcloud --project=${PROJECT} certificate-manager certificates create edge2mesh-cert \
    --domains="frontend.endpoints.${PROJECT}.cloud.goog"
建立憑證對應組合:
gcloud --project=${PROJECT} certificate-manager maps create edge2mesh-cert-map使用憑證對應關係將憑證附加至憑證對應組合:
gcloud --project=${PROJECT} certificate-manager maps entries create edge2mesh-cert-map-entry \
    --map="edge2mesh-cert-map" \
    --certificates="edge2mesh-cert" \
    --hostname="frontend.endpoints.${PROJECT}.cloud.goog"
部署 GKE Gateway 和 HTTPRoute 資源
在本節中,您將設定 GKE Gateway 資源,透過 gke-l7-global-external-managed
gatewayClass 佈建 Google Cloud 應用程式負載平衡器。此外,您也會設定 HTTPRoute 資源,將要求轉送至應用程式,並執行 HTTP 至 HTTP(S) 的重新導向。
在 Cloud Shell 中執行下列指令,將資訊清單建立為
gke-gateway.yaml:Gatewaycat <<EOF > ${WORKDIR}/gke-gateway.yaml kind: Gateway apiVersion: gateway.networking.k8s.io/v1 metadata: name: external-http namespace: ingress-gateway annotations: networking.gke.io/certmap: edge2mesh-cert-map spec: gatewayClassName: gke-l7-global-external-managed # gke-l7-gxlb listeners: - name: http # list the port only so we can redirect any incoming http requests to https protocol: HTTP port: 80 - name: https protocol: HTTPS port: 443 addresses: - type: NamedAddress value: e2m-gclb-ip # reference the static IP created earlier EOF套用
Gateway資訊清單,建立名為external-http的Gateway:kubectl apply -f ${WORKDIR}/gke-gateway.yaml建立預設
HTTPRoute.yaml檔案:cat << EOF > ${WORKDIR}/default-httproute.yaml apiVersion: gateway.networking.k8s.io/v1 kind: HTTPRoute metadata: name: default-httproute namespace: ingress-gateway spec: parentRefs: - name: external-http namespace: ingress-gateway sectionName: https rules: - matches: - path: value: / backendRefs: - name: asm-ingressgateway port: 443 EOF套用預設
HTTPRoute:kubectl apply -f ${WORKDIR}/default-httproute.yaml建立額外的
HTTPRoute.yaml檔案,執行從 HTTP 重新導向至 HTTP(S) 的作業:cat << EOF > ${WORKDIR}/default-httproute-redirect.yaml kind: HTTPRoute apiVersion: gateway.networking.k8s.io/v1 metadata: name: http-to-https-redirect-httproute namespace: ingress-gateway spec: parentRefs: - name: external-http namespace: ingress-gateway sectionName: http rules: - filters: - type: RequestRedirect requestRedirect: scheme: https statusCode: 301 EOF套用重新導向
HTTPRoute:kubectl apply -f ${WORKDIR}/default-httproute-redirect.yaml對帳需要時間。請使用下列指令,直到
programmed=true:kubectl get gateway external-http -n ingress-gateway -w
安裝 Online Boutique 範例應用程式
在 Cloud Shell 中建立專屬的
onlineboutique命名空間:kubectl create namespace onlineboutique為
onlineboutique命名空間新增標籤:kubectl label namespace onlineboutique istio-injection=enabled使用
istio-injection=enabled標記onlineboutique命名空間,即可指示 Cloud Service Mesh 在部署應用程式時,自動插入 Envoy 補充資訊 Proxy。下載 Online Boutique 範例應用程式的 Kubernetes YAML 檔案:
curl -LO \
https://raw.githubusercontent.com/GoogleCloudPlatform/microservices-demo/main/release/kubernetes-manifests.yaml
部署 Online Boutique 應用程式:
kubectl apply -f kubernetes-manifests.yaml -n onlineboutique輸出內容類似於下列內容 (包括有關 GKE Autopilot 設定預設資源要求和限制的警告):
Warning: autopilot-default-resources-mutator:Autopilot updated Deployment onlineboutique/emailservice: adjusted resources to meet requirements for containers [server] (see http://g.co/gke/autopilot-resources)
deployment.apps/emailservice created
service/emailservice created
Warning: autopilot-default-resources-mutator:Autopilot updated Deployment onlineboutique/checkoutservice: adjusted resources to meet requirements for containers [server] (see http://g.co/gke/autopilot-resources)
deployment.apps/checkoutservice created
service/checkoutservice created
Warning: autopilot-default-resources-mutator:Autopilot updated Deployment onlineboutique/recommendationservice: adjusted resources to meet requirements for containers [server] (see http://g.co/gke/autopilot-resources)
deployment.apps/recommendationservice created
service/recommendationservice created
...
確認所有部署作業都已啟動並運作中:
kubectl get pods -n onlineboutique輸出結果會與下列內容相似:
NAME                                     READY   STATUS    RESTARTS   AGE
adservice-64d8dbcf59-krrj9               2/2     Running   0          2m59s
cartservice-6b77b89c9b-9qptn             2/2     Running   0          2m59s
checkoutservice-7668b7fc99-5bnd9         2/2     Running   0          2m58s
...
請稍候幾分鐘,讓 GKE Autopilot 叢集佈建必要的運算基礎架構,以支援應用程式。
執行下列指令,以
frontend-virtualservice.yaml形式建立VirtualService資訊清單:cat <<EOF > frontend-virtualservice.yaml apiVersion: networking.istio.io/v1beta1 kind: VirtualService metadata: name: frontend-ingress namespace: onlineboutique spec: hosts: - "frontend.endpoints.${PROJECT}.cloud.goog" gateways: - ingress-gateway/asm-ingressgateway http: - route: - destination: host: frontend port: number: 80 EOFVirtualService是在應用程式命名空間 (onlineboutique) 中建立。通常應用程式擁有者會決定及設定流量如何和要轉送至frontend應用程式,因此VirtualService是由應用程式擁有者部署。在叢集中部署
frontend-virtualservice.yaml:kubectl apply -f frontend-virtualservice.yaml請前往下列連結:
echo "https://frontend.endpoints.${PROJECT}.cloud.goog"系統會顯示 Online Boutique 前端。

如要顯示憑證詳細資料,請依序點選瀏覽器網址列中的 「查看網站資訊」和「憑證 (有效)」。
憑證檢視器會顯示受管理憑證的詳細資料,包括到期日和憑證核發者。
您現在有一個全域 HTTPS 負載平衡器,可做為服務網格代管應用程式的前端。
清除所用資源
部署完成後,您可以清理在 Google Cloud 上建立的資源,這樣日後就不需再為這些資源付費。您可以完全刪除專案,也可以刪除叢集資源,然後刪除叢集。
刪除專案
- 前往 Google Cloud 控制台的「Manage resources」(管理資源) 頁面。
- 在專案清單中選取要刪除的專案,然後點選「Delete」(刪除)。
- 在對話方塊中輸入專案 ID,然後按一下 [Shut down] (關閉) 以刪除專案。
刪除個別資源
如要保留您在此部署作業中使用的 Google Cloud 專案,請刪除個別資源:
在 Cloud Shell 中,刪除
HTTPRoute資源:kubectl delete -f ${WORKDIR}/default-httproute-redirect.yaml kubectl delete -f ${WORKDIR}/default-httproute.yaml刪除 GKE Gateway 資源:
kubectl delete -f ${WORKDIR}/gke-gateway.yaml刪除 TLS 憑證資源 (包括憑證對應關係及其上層憑證對應組合):
gcloud --project=${PROJECT} certificate-manager maps entries delete edge2mesh-cert-map-entry --map="edge2mesh-cert-map" --quiet
gcloud --project=${PROJECT} certificate-manager maps delete edge2mesh-cert-map --quiet
gcloud --project=${PROJECT} certificate-manager certificates delete edge2mesh-cert --quiet
刪除 Endpoints DNS 項目:
gcloud endpoints services delete "frontend.endpoints.${PROJECT}.cloud.goog"輸出結果會與下列內容相似:
Are you sure? This will set the service configuration to be deleted, along
with all of the associated consumer information. Note: This does not
immediately delete the service configuration or data and can be undone using
the undelete command for 30 days. Only after 30 days will the service be
purged from the system.
系統提示是否繼續時,請輸入 Y。
輸出結果會與下列內容相似:
Waiting for async operation operations/services.frontend.endpoints.edge2mesh.cloud.goog-5 to complete...
Operation finished successfully. The following command can describe the Operation details:
 gcloud endpoints operations describe operations/services.frontend.endpoints.edge2mesh.cloud.goog-5
刪除靜態 IP 位址:
gcloud compute addresses delete ingress-ip --global輸出結果會與下列內容相似:
The following global addresses will be deleted:

 - [ingress-ip]
系統提示是否繼續時,請輸入 Y。
輸出結果會與下列內容相似:
Deleted
[https://www.googleapis.com/compute/v1/projects/edge2mesh/global/addresses/ingress-ip].
刪除 GKE 叢集:
gcloud container clusters delete $CLUSTER_NAME --zone $CLUSTER_LOCATION輸出結果會與下列內容相似:
The following clusters will be deleted.
- [edge-to-mesh] in [us-central1]
系統提示是否繼續時,請輸入 Y。
幾分鐘後,輸出內容應如下所示:
Deleting cluster edge-to-mesh...done.
Deleted
[https://container.googleapis.com/v1/projects/e2m-doc-01/zones/us-central1/clusters/edge-to-mesh].
後續步驟
- 瞭解更多 GKE Ingress 提供的功能,可與服務網格搭配使用。
- 瞭解 GKE 適用的不同類型 Cloud Load Balancing。
- 瞭解 Cloud Service Mesh 提供的功能。
- 瞭解如何在多個 GKE 叢集中部署 Ingress,以進行多區域負載平衡。
- 如要查看更多參考架構、圖表和最佳做法,請瀏覽 Cloud Architecture Center。