


本頁說明如何將 Agent Development Kit (ADK) 代理程式連結至 Agent Platform Sessions,並在本地和正式環境中使用受管理的工作階段。
事前準備
這些操作說明會使用下列基本專案檔案結構,定義 ADK 代理及其支援的執行器和部署程式碼:
my_agent/
    agent.py      # main agent code
    runner.py     # code for interacting with the agent
    deploy.py     # code for deploying the agent to Google Cloud
請按照「設定環境」一文中的「取得必要角色」和「驗證」步驟,確認環境已設定完成。
設定環境變數
如要使用 ADK,請設定環境變數:
import os

os.environ["GOOGLE_GENAI_USE_ENTERPRISE"] = "TRUE"
os.environ["GOOGLE_CLOUD_PROJECT"] = "PROJECT_ID"
os.environ["GOOGLE_CLOUD_LOCATION"] = "LOCATION"
更改下列內容:
- PROJECT_ID:專案 ID。
- LOCATION:您的區域。如要瞭解 Memory Bank 支援的區域,請參閱這篇文章。
建立 Agent Runtime 執行個體
如要存取 Agent Platform Sessions,請先使用 Agent Runtime 執行個體。您不需要部署任何程式碼,即可開始使用 Sessions。如果您曾使用 Agent Engine,建立 Agent Runtime 執行個體只需幾秒鐘,不必部署程式碼。如果您是第一次使用 Agent Engine,可能需要較長的處理時間。
Google Cloud 專案
import vertexai

client = vertexai.Client(
  project="PROJECT_ID",
  location="LOCATION"
)

# If you don't have an Agent Engine instance already, create an instance.
agent_engine = client.agent_engines.create(
    config={
      "display_name": "My Session Store",
    }
)

# Print the agent engine ID, you will need it in the later steps to initialize
# the ADK `VertexAiSessionService`.
print(agent_engine.api_resource.name.split("/")[-1])
更改下列內容:
PROJECT_ID:專案 ID。
LOCATION:您的區域。如要查看支援 Sessions 的區域,請參閱這篇文章。
開發 ADK 代理
如要建立 ADK 代理,請按照 Agent Development Kit 中的操作說明,或使用下列程式碼建立代理,向使用者傳送固定問候語。將這段程式碼儲存到名為 agent.py 的檔案。
# file: my_agent/agent.py
from google import adk

def greetings(query: str):
  """Tool to greet user."""
  if 'hello' in query.lower():
    return {"greeting": "Hello, world"}
  else:
    return {"greeting": "Goodbye, world"}

# Define an ADK agent
root_agent = adk.Agent(
    model="gemini-2.0-flash",
    name='my_agent',
    instruction="You are an Agent that greet users, always use greetings tool to respond.",
    tools=[greetings]
)
設定 ADK 執行器
ADK 執行階段會協調代理、工具和回呼的執行作業,並協調讀取及寫入工作階段的呼叫。使用 VertexAiSessionService 初始化 Runner,與 Agent Platform Sessions 建立連線。將這段程式碼儲存到名為 runner.py 的檔案。
Google Cloud 專案
# file: my_agent/runner.py
import agent # Import from your agent.py
from google.adk import Runner
from google.adk.sessions import VertexAiSessionService
from google.genai import types

app_name="APP_NAME"
user_id="USER_ID"

# Create the ADK runner with VertexAiSessionService
session_service = VertexAiSessionService(
      project="PROJECT_ID",
      location="LOCATION",
      agent_engine_id="AGENT_ENGINE_ID"
)
runner = Runner(
    agent=agent.root_agent,
    app_name=app_name,
    session_service=session_service)

# Helper method to send query to the runner
async def call_agent(query, session_id, user_id):
  content = types.Content(role='user', parts=[types.Part(text=query)])
  async for event in runner.run_async(
      user_id=user_id, session_id=session_id, new_message=content):
      if event.is_final_response():
          final_response = event.content.parts[0].text
          print("Agent Response: ", final_response)
更改下列內容:
APP_NAME:代理程式應用程式的名稱。
USER_ID:選擇自己的使用者 ID,最多 128 個字元。 例如:
user-123。AGENT_ENGINE_ID:Agent Runtime 執行個體的資源 ID。
如果是已部署的代理程式,資源 ID 會列為
GOOGLE_CLOUD_AGENT_ENGINE_ID環境變數如果是本機代理程式,可以使用
agent_engine.api_resource.name.split("/")[-1]擷取資源 ID。
與代理程式互動
定義代理並設定 Agent Platform 工作階段後,即可與代理互動,確認工作階段記錄和狀態是否會保留。
ADK UI
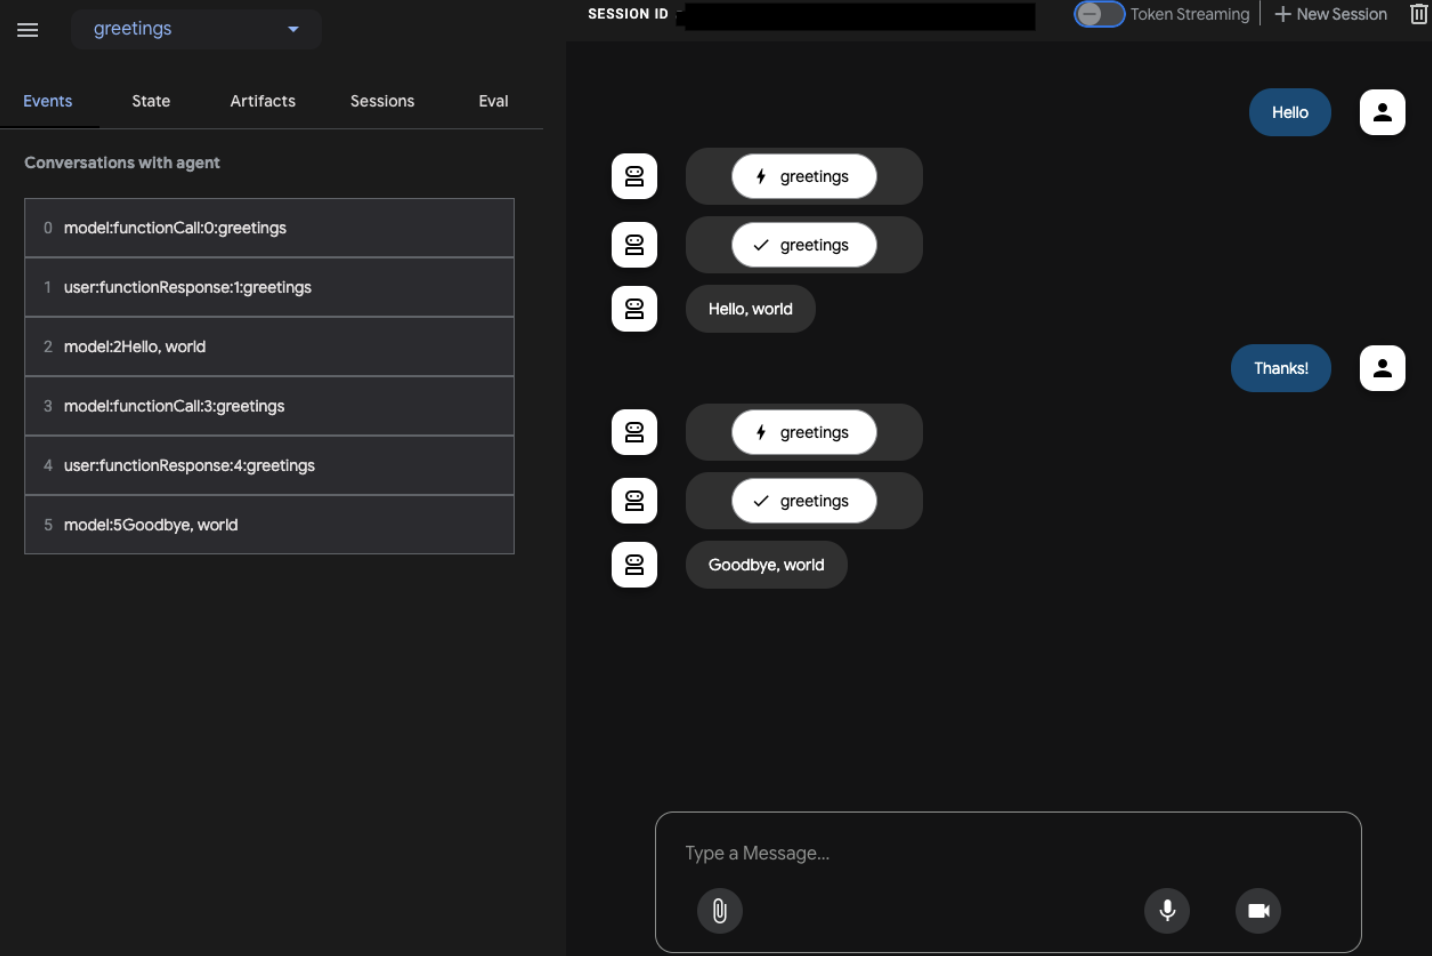
如要使用 ADK 使用者介面測試代理程式,並連線至 Agent Platform Sessions,請在終端機中執行 adk web 指令。
adk web 通常會從 .env 檔案讀取環境變數,但如果您使用 --session_service_uri 旗標,系統會忽略這個檔案。您必須先在終端機工作階段中設定 GOOGLE_CLOUD_PROJECT 和 GOOGLE_CLOUD_LOCATION 環境變數,再執行指令。
export GOOGLE_CLOUD_PROJECT="PROJECT_ID"export GOOGLE_CLOUD_LOCATION="LOCATION"adk web --session_service_uri=agentengine://AGENT_ENGINE_ID
# Sample output
+-----------------------------------------------------------------------------+
| ADK Web Server started                                                      |
|                                                                             |
| For local testing, access at http://localhost:8000.                         |
+-----------------------------------------------------------------------------+

INFO:     Application startup complete.
INFO:     Uvicorn running on http://0.0.0.0:8000 (Press CTRL+C to quit)
Python
使用 ADK Python 程式碼管理工作階段和狀態。在 runner.py 檔案結尾新增下列程式碼,與代理互動。
為簡潔起見,下列程式碼片段包含頂層 await 呼叫。如要將這段程式碼做為 Python 指令碼執行,請將程式碼片段放在 async 函式中,並使用 asyncio.run() 執行,如以下範例所示:
import asyncio

async def main():
  # Place one or more snippets here.
  # For example:
  session = await session_service.create_session(
         app_name=app_name,
         user_id=user_id)

  await call_agent("Hello!", session.id, user_id)

asyncio.run(main())
建立工作階段並查詢代理
請使用下列程式碼建立工作階段,並將查詢傳送至代理程式。 指定自訂工作階段 ID,即可使用自己的命名架構整理工作階段,或從其他服務快速轉換。如未指定工作階段 ID,Agent Platform 會自動產生 ID。
# file: my_agent/runner.py
# Create a session
session = await session_service.create_session(
       app_name=app_name,
       user_id=user_id,
       session_id=session_id)

await call_agent("Hello!", session.id, user_id)
# Agent response: "Hello, world"

await call_agent("Thanks!", session.id, user_id)
# Agent response: "Goodbye, world"
如要使用自訂工作階段 ID,請注意下列限制,以免與系統產生的 ID 發生衝突:
- 如果第一個字元是字母,ID 長度最多可達 63 個字元。有效字元為小寫英文字母、數字和連字號 (
[a-z0-9-])。最後一個字元須為英文字母或數字。 - 如果第一個字元是數字,ID 最多可有 9 個字元。有效字元為數字 (
[0-9]),開頭不得為零。
建立工作階段並傳遞至執行器後,ADK 會使用工作階段儲存目前互動中的事件。您也可以提供先前工作階段的 ID,繼續執行該工作階段。
設定工作階段存留時間 (TTL)
所有工作階段都必須有到期時間。建立或更新工作階段時,您可以定義這個到期時間。工作階段及其子項事件會在到期時間過後自動刪除。您可以直接設定到期時間 (expire_time),也可以設定存留時間 (ttl),以秒為單位。如果兩者皆未指定,系統會套用 365 天的預設 TTL。
存留時間
如果您設定存留時間,伺服器會將新建立的工作階段到期時間計算為 create_time + ttl,或將更新的工作階段到期時間計算為 update_time + ttl。
  session = await session_service.create_session(
        app_name=app_name,
        user_id=user_id,
        # Session will be deleted 10 days after creation time.
        ttl=f"{24 * 60 * 60 * 10}s"
  )
  ```
到期時間
  import datetime

  expire_time = datetime.datetime.now(
        tz=datetime.timezone.utc) + datetime.timedelta(seconds=24 * 60 * 60 * 10)

  session = await session_service.create_session(
        app_name=app_name,
        user_id=user_id,
        # Session will be deleted at the provided time (10 days after current time).
        expire_time=expire_time.isoformat()
  )
列出現有工作階段
列出與特定使用者 ID 相關的所有現有工作階段。
# List sessions
sessions = await session_service.list_sessions(app_name=app_name,user_id=user_id)
print(sessions)
# ListSessionsResponse(session_ids=['1122334455', '9988776655'])
管理工作階段狀態
狀態會保留代理程式對話所需的資訊。建立工作階段時,您可以將初始狀態設為字典:
# Create a session with state
session = await session_service.create_session(
    app_name=app_name,
    user_id=user_id,
    state={'key': 'value'})

print(session.state['key'])
# value
如要在執行器外部更新工作階段狀態,請使用 state_delta 將新事件附加至工作階段:
# file: my_agent/runner.py
from google.adk.events import Event, EventActions
import time

# Define state changes
state_changes = {'key': 'new_value'}

# Create event with actions
actions_with_update = EventActions(state_delta=state_changes)
system_event = Event(
invocation_id="invocation_id",
author="system", # Or 'agent', 'tool' etc.
actions=actions_with_update,
timestamp=time.time()
)

# Append the event
await session_service.append_event(session, system_event)

# Check updated state
updated_session = await session_service.get_session(
    app_name=app_name,
    user_id=user_id,
    session_id=session.id)
# State is updated to new value
print(updated_session.state['key'])
# new_value
活動的自訂欄位
ADK 支援彈性事件結構定義,因此您可以在工作階段事件中加入任意資料。這項功能有助於與其他代理程式架構互通,或儲存自訂事件資料。
附加含有自訂欄位的事件時,ADK 會將事件資料序列化為儲存的工作階段事件的 raw_event 欄位。
# Create an event with custom fields
custom_event = Event(
  invocation_id="invocation_id",
  author="user",
  timestamp=time.time(),
  custom_field="custom_value",
  another_field={"nested_key": "nested_value"}
)

# Append the event
await session_service.append_event(session, custom_event)
擷取工作階段時,擷取的事件會保留這些自訂欄位。
刪除工作階段
刪除與使用者 ID 相關聯的特定工作階段:
await session_service.delete_session(app_name=app_name, user_id=user_id, session_id=session.id)
將代理部署至 Agent Platform
在本機測試代理程式後,您可以更新 Agent Platform 執行個體並加入參數,將代理程式部署至正式環境:
Google Cloud 專案
client.agent_engines.update(
    resource_name=agent_engine.api_resource.name,
    agent=AGENT,
    config={
      "display_name": DISPLAY_NAME,      # Optional.
      "requirements": REQUIREMENTS,      # Optional.
      "staging_bucket": STAGING_BUCKET,  # Required.
    },
)
更改下列內容:
AGENT:實作
query / stream_query方法的應用程式 (例如 ADK 代理的AdkApp)。DISPLAY_NAME:代理程式的易記名稱。
REQUIREMENTS:代理程式所需的 pip 套件清單。例如:
["google-cloud-storage", "google-cloud-aiplatform[agent_engines,adk]"]。STAGING_BUCKET:以
gs://為前置字元的 Cloud Storage bucket。
清除所用資源
如要清除此專案中使用的所有資源,您可以刪除 Agent Runtime 執行個體及其子項資源:
agent_engine.delete(force=True)