

This guide outlines the deployment of a highly-available, multi-zone Oracle Data Guard configuration on a Google Distributed Cloud (GDC) air-gapped standard cluster. This setup uses the Oracle Database Enterprise Edition and leverages GDC's existing capabilities for storage and networking.
This deployment uses the official Oracle Database Operator for Kubernetes, which automates the lifecycle management of the database.
Architecture
The architecture describes a high-availability Oracle Database deployment managed by the Oracle Database Operator within a GDC standard cluster. A high-availability deployment consists of a primary database and a standby database configured with Data Guard for replication and failover.
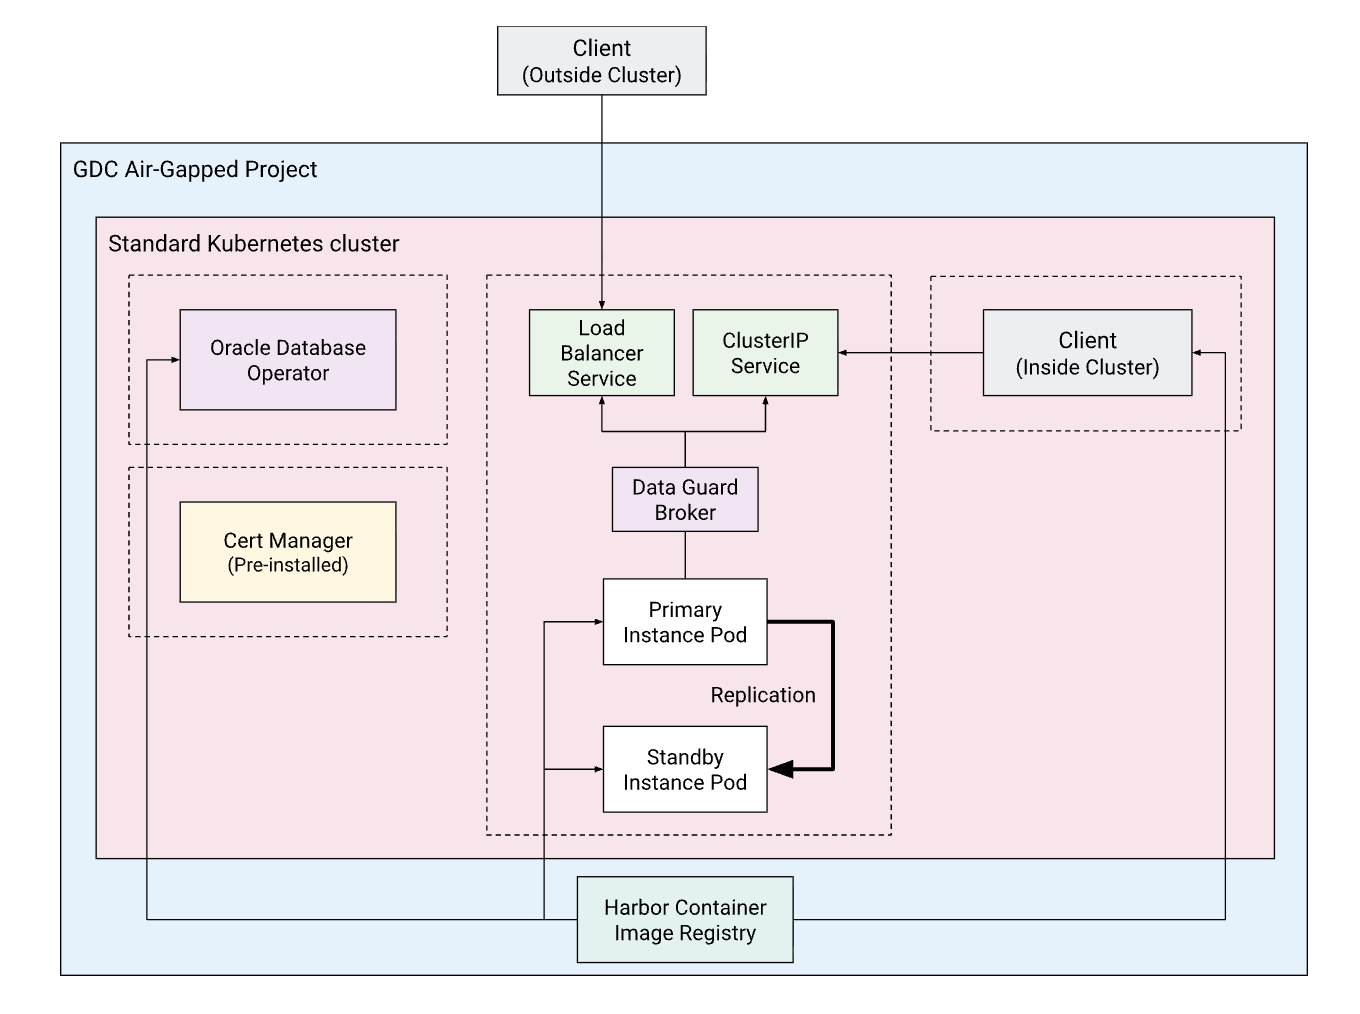
The key components are the following:
- GDC project: the project container for your resources.
- Standard Kubernetes cluster: a standard cluster providing the compute resources.
- Oracle Database Operator: a Kubernetes operator that automates the provisioning, lifecycle management, and observability of Oracle databases. It simplifies complex tasks such as patching, backup, and recovery, making it easier to run stateful Oracle workloads in a containerized environment.
- Primary database: the active read-write containerized database instance.
- Standby database: the replica read-only (or read-write during failover) database instance.
- Data Guard Broker: orchestrates the configuration and role transitions (switchover/failover) between the databases.
- Harbor: the private container registry used to host the database, operator, and client images within the air-gapped environment.
- Cert-manager: the operator relies on
cert-managerfor managing webhooks certificates.cert-managercomes pre-installed on GDC standard clusters.
In this guide, you deploy the operator in its own namespace
(oracle-database-operator-system) and the database instance in a separate
namespace (oracle-dbs). These namespaces are illustrated with dashed-border
boxes in the architecture diagram.
This separation is recommended for clarity and manageability. However, it is up to you to decide how to organize your databases. For example, you might group certain databases in different namespaces to manage granular access control (RBAC) based on workload needs, team ownership, or security specifications.
Before you begin
Before starting the deployment, you must ensure that your environment meets the following requirements:
- Create a project that will serve as the holder for all resources generated throughout this guide.
Give your user the Cluster Admin and Standard Cluster Admin roles for your project. This lets you create a standard Kubernetes cluster and manage its resources:
export PROJECT_ID=PROJECT_ID
export USER_NAME=USER_NAME

gdcloud projects add-iam-policy-binding ${PROJECT_ID} \
  --member="user:${USER_NAME}" \
  --role=cluster-admin

gdcloud projects add-iam-policy-binding ${PROJECT_ID} \
  --member="user:${USER_NAME}" \
  --role=standard-cluster-admin
Create a Harbor instance and a Harbor project to host the container images needed for this guide.
Give your user the Harbor Instance Admin role so you can upload images to your Harbor instance:
gdcloud projects add-iam-policy-binding ${PROJECT_ID} \
  --member="user:${USER_NAME}" \
  --role=harbor-instance-admin
Create a Harbor robot account in your Harbor project. Later in this guide, the robot account's credentials will be stored in Kubernetes secrets, enabling the cluster to pull images from Harbor when instantiating containers.
Create a standard Kubernetes cluster with at least two worker nodes, each having a minimum of 16GB memory. For example:
kubectl --kubeconfig MGMT_API_KUBECONFIG create -f - <<EOF
apiVersion: cluster.gdc.goog/v1
kind: Cluster
metadata:
  name: ${CLUSTER_NAME}
  namespace: ${PROJECT_ID}
spec:
  nodePools:
  - machineTypeName: n3-standard-8-gdc
    nodeCount: 2
    name: ${CLUSTER_NAME}-node-pool
EOF
Set up your environment variables. These will be used throughout the guide to create and reference resources:
Notes:
- The two database instances are arbitrarily named
blueandgreenthroughout this guide. Initially theblueinstance is the primary, andgreenis the standby.
# General info export PROJECT_ID="PROJECT_ID" export ZONE="ZONE" export ORG_NAME="ORG_NAME" export CLUSTER_NAME="CLUSTER_NAME" # Software versions export ORACLE_OPERATOR_VERSION="2.1.0" export ORACLE_DB_VERSION="21.3.0.0" # Namespaces export ORACLE_OPERATOR_NAMESPACE="ORACLE_OPERATOR_NAMESPACE" export DB_NAMESPACE="DATABASE_NAMESPACE" # Harbor config export HARBOR_INSTANCE_PROJECT_ID="HARBOR_PROJECT_ID" export HARBOR_INSTANCE_NAME="HARBOR_INSTANCE_NAME" export HARBOR_INSTANCE_URL="HARBOR_INSTANCE_URL" export HARBOR_PROJECT="HARBOR_PROJECT" export HARBOR_PULL_SECRET_NAME="HARBOR_PULL_SECRET_NAME" export HARBOR_ROBOT_ACCOUNT="robot\$HARBOR_PROJECT+ROBOT_NAME" export HARBOR_ROBOT_SECRET="HARBOR_ROBOT_SECRET" # Oracle database config export ADMIN_PASSWORD="ADMIN_PASSWORD" export ADMIN_PASSWORD_SECRET_NAME="ADMIN_PASSWORD_SECRET_NAME" # Database names export DB_NAME_BLUE="database-blue" export DB_NAME_GREEN="database-green"- The two database instances are arbitrarily named
Network note: This guide assumes it is being run from a bastion node that has access to the GDC APIs and also has access to the internet to download the Oracle Operator's manifests and container images. If you are running this from a machine without internet access, you must obtain these assets separately (for example, using
docker saveto export images from a connected machine anddocker loadto import them) and securely upload them to your environment before proceeding.Before proceeding, you must create an account and obtain an API token at container-registry.oracle.com, and then accept the license agreement for both the Oracle Database Enterprise Edition and Oracle Instant Client images.
Load images into Harbor
Since clusters within Google Distributed Cloud air-gapped cannot access external registries, you must mirror the required images to your private Harbor instance.
Sign in to Oracle Container Registry
You must first authenticate with the official Oracle registry to pull the base images:
docker --config=./docker-oracle login container-registry.oracle.com
After a successful login, credentials will be saved in
./docker-oracle/config.json.
Log in to Harbor
Authenticate with your private Harbor instance:
docker --config=./docker-harbor login ${HARBOR_INSTANCE_URL} \
  -u ${HARBOR_ROBOT_ACCOUNT} \
  -p ${HARBOR_ROBOT_SECRET}
After a successful login, the robot account's credentials will be saved in
./docker-harbor/config.json.
Pull, tag, and push images
Download the images from the official Oracle container registry and push them to your internal Harbor project. You will mirror the operator, the enterprise database, and the instant client for testing.
Mirror the Oracle database operator image:
docker --config=./docker-oracle pull \
  container-registry.oracle.com/database/operator:${ORACLE_OPERATOR_VERSION} \
  --platform linux/amd64

docker tag container-registry.oracle.com/database/operator:${ORACLE_OPERATOR_VERSION} \
  ${HARBOR_INSTANCE_URL}/${HARBOR_PROJECT}/oracle-operator:${ORACLE_OPERATOR_VERSION}

docker --config=./docker-harbor push \
  ${HARBOR_INSTANCE_URL}/${HARBOR_PROJECT}/oracle-operator:${ORACLE_OPERATOR_VERSION}
Mirror the Oracle database Enterprise image:
docker --config=./docker-oracle pull \
  container-registry.oracle.com/database/enterprise:${ORACLE_DB_VERSION} \
  --platform linux/amd64

docker tag container-registry.oracle.com/database/enterprise:${ORACLE_DB_VERSION} \
  ${HARBOR_INSTANCE_URL}/${HARBOR_PROJECT}/oracle-enterprise:${ORACLE_DB_VERSION}

docker --config=./docker-harbor push \
  ${HARBOR_INSTANCE_URL}/${HARBOR_PROJECT}/oracle-enterprise:${ORACLE_DB_VERSION}
Mirror the Oracle instant client image:
docker --config=./docker-oracle pull \
  container-registry.oracle.com/database/instantclient:latest \
  --platform linux/amd64

docker tag container-registry.oracle.com/database/instantclient:latest \
  ${HARBOR_INSTANCE_URL}/${HARBOR_PROJECT}/oracle-instantclient:latest

docker --config=./docker-harbor push \
  ${HARBOR_INSTANCE_URL}/${HARBOR_PROJECT}/oracle-instantclient:latest
Configure cluster access
Before deploying resources, retrieve the credentials for your standard cluster and create a convenient alias:
Retrieve the kubeconfig file for your standard cluster:
KUBECONFIG=kubeconfig-${CLUSTER_NAME}.yaml gdcloud clusters \
  get-credentials ${CLUSTER_NAME} \
  --standard \
  --project ${PROJECT_ID} \
  --zone ${ZONE}
Create the
kkalias to simplify subsequent commands:alias kk="kubectl --kubeconfig kubeconfig-${CLUSTER_NAME}.yaml"
Create secrets
Create a Kubernetes Secret to allow the cluster to pull images from Harbor
using the credentials saved in your local ./docker-harbor/config.json. You
need this secret in both the operator's namespace (to pull the operator image)
and the database's namespace (to pull the database image).
Create the namespace for the operator:
kk create ns ${ORACLE_OPERATOR_NAMESPACE}Create the pull secret for the operator:
kk create secret docker-registry ${HARBOR_PULL_SECRET_NAME} \
  --from-file=.dockerconfigjson=./docker-harbor/config.json \
  -n ${ORACLE_OPERATOR_NAMESPACE}
Create the namespace for the databases:
kk create ns ${DB_NAMESPACE}Create the image pull secret for the database containers:
kk create secret docker-registry ${HARBOR_PULL_SECRET_NAME} \
  --from-file=.dockerconfigjson=./docker-harbor/config.json \
  -n ${DB_NAMESPACE}
Create the secret for the databases' administrative password:
kk create secret generic ${ADMIN_PASSWORD_SECRET_NAME} \
  --from-literal=password=${ADMIN_PASSWORD} \
  -n ${DB_NAMESPACE}
Install the Oracle Database Operator
Now, install the Oracle Database Operator into your cluster by applying three manifests:
Cluster Role Binding: Sets up the necessary permissions for the operator to function cluster-wide.
kk apply -f https://raw.githubusercontent.com/oracle/oracle-database-operator/refs/tags/v${ORACLE_OPERATOR_VERSION}/rbac/cluster-role-binding.yamlNode RBAC: Grants permissions to read node topology, which is critical for correct pod scheduling.
kk apply -f https://raw.githubusercontent.com/oracle/oracle-database-operator/refs/tags/v${ORACLE_OPERATOR_VERSION}/rbac/node-rbac.yamlOperator Deployment: Deploys the operator pods and custom resource definitions. This command downloads the official manifest, replaces the image path with your Harbor URL, injects the
imagePullSecretsconfiguration so Kubernetes can authenticate with Harbor, and applies the result:curl -L https://raw.githubusercontent.com/oracle/oracle-database-operator/refs/tags/v${ORACLE_OPERATOR_VERSION}/oracle-database-operator.yaml \ | sed "s|container-registry.oracle.com/database/operator:latest|${HARBOR_INSTANCE_URL}/${HARBOR_PROJECT}/oracle-operator:${ORACLE_OPERATOR_VERSION}|g" \ | awk "/terminationGracePeriodSeconds: 10/{print; print \" imagePullSecrets:\n - name: ${HARBOR_PULL_SECRET_NAME}\"; next}1" \ | kk apply -f -Wait for the operator pods to be running:
kk get pods -n ${ORACLE_OPERATOR_NAMESPACE} --watchThe output should look like the following:
NAME                                                           READY   STATUS    RESTARTS   AGE
oracle-database-operator-controller-manager-5f7b56874d-k9v4z   1/1     Running   0          45s
oracle-database-operator-controller-manager-5f7b56874d-n2x8m   1/1     Running   0          45s
oracle-database-operator-controller-manager-5f7b56874d-r6z7q   1/1     Running   0          45s
Deploy primary and standby databases
You now deploy two database instances in the same namespace sequentially.
Deploy the primary instance
Run the following command to create the primary database instance:
apiVersion: database.oracle.com/v4
kind: SingleInstanceDatabase
metadata:
  name: ${DB_NAME_BLUE}
  namespace: ${DB_NAMESPACE}
spec:
  replicas: 1
  edition: enterprise
  image:
    pullFrom: "${HARBOR_INSTANCE_URL}/${HARBOR_PROJECT}/oracle-enterprise:${ORACLE_DB_VERSION}"
    pullSecrets: ${HARBOR_PULL_SECRET_NAME}
    prebuiltDB: true
  sid: ORCLBLUE
  pdbName: ORCLPDB1
  archiveLog: true
  flashBack: true
  forceLog: true
  adminPassword:
    secretName: "${ADMIN_PASSWORD_SECRET_NAME}"
    secretKey: "password"
  persistence:
    size: "50Gi"
    storageClass: "standard-rwo"
    accessMode: "ReadWriteOnce"
  resources:
    requests:
      memory: "4Gi"
Key configuration parameters:
sid/pdbName: defines the system identifier (SID) and pluggable database (PDB) name.edition: specifies the database edition (enterprisein this case).image: points to your private Harbor registry image.persistence: requests a 50Gi persistent volume using thestandard-rwoStorageClass, which creates a zonal persistent disk in GDC.replicas: sets the number of pods to 1 for the instance.archiveLog: enables Archive Log mode, which is required for Data Guard.flashBack: enables Flashback Database, allowing you to return the database to a previous point in time.forceLog: enables Force Logging, ensuring all changes are logged even for operations that normally bypass logging.
For a complete list of configuration options, including custom init parameters and resource limits, refer to the official documentation.
The database creation is resource-intensive and might take 10 to 20 minutes.
Wait for the database to be fully ready before proceeding. This is critical because the standby database requires the primary to be accessible to establish replication.
Wait until the database pod is
Running:kk get po -n ${DB_NAMESPACE} -l app=${DB_NAME_BLUE} -wOutput should look like the following:
NAME                   READY   STATUS    RESTARTS   AGE
database-blue-i5xdj   0/1     Pending   0          0s
database-blue-i5xdj   0/1     Pending   0          0s
database-blue-i5xdj   0/1     Pending   0          1s
database-blue-i5xdj   0/1     Init:0/1   0          1s
database-blue-i5xdj   0/1     PodInitializing   0          98s
database-blue-i5xdj   0/1     Running           0          99s
database-blue-i5xdj   1/1     Running           0          99s
Then watch the logs and wait for the
DATABASE IS READY TO USE!message:kk logs -n ${DB_NAMESPACE} -l app=${DB_NAME_BLUE} -fOutput should contain the following:
#########################
DATABASE IS READY TO USE!
#########################
Verify the status is
Healthyand the role isPRIMARY:kk get sidb -n ${DB_NAMESPACE} ${DB_NAME_BLUE}Output should look like the following:
NAME            EDITION      STATUS    ROLE
database-blue   Enterprise   Healthy   PRIMARY
Deploy the standby instance
After the primary is healthy, deploy the standby instance. Note that the Data
Guard parameters (archiveLog, flashBack, forceLog) are inherited from the
primary and must not be specified in the standby manifest:
Deploy the standby instance:
apiVersion: database.oracle.com/v4
kind: SingleInstanceDatabase
metadata:
  name: ${DB_NAME_GREEN}
  namespace: ${DB_NAMESPACE}
spec:
  replicas: 1
  edition: enterprise
  image:
    pullFrom: "${HARBOR_INSTANCE_URL}/${HARBOR_PROJECT}/oracle-enterprise:${ORACLE_DB_VERSION}"
    pullSecrets: ${HARBOR_PULL_SECRET_NAME}
    prebuiltDB: true
  sid: ORCLGREEN
  pdbName: ORCLPDB1
  adminPassword:
    secretName: "${ADMIN_PASSWORD_SECRET_NAME}"
    secretKey: "password"
  createAs: standby
  primaryDatabaseRef: ${DB_NAME_BLUE}
  persistence:
    size: "50Gi"
    storageClass: "standard-rwo"
    accessMode: "ReadWriteOnce"
  resources:
    requests:
      memory: "4Gi"
Wait until the database pod is
Running:kk get po -n ${DB_NAMESPACE} -l app=${DB_NAME_GREEN} -wOutput should look like the following:
NAME                   READY   STATUS    RESTARTS   AGE
database-green-q1gur   0/1     Pending   0          0s
database-green-q1gur   0/1     Pending   0          0s
database-green-q1gur   0/1     Pending   0          1s
database-green-q1gur   0/1     Init:0/1   0          1s
database-green-q1gur   0/1     PodInitializing   0          98s
database-green-q1gur   0/1     Running           0          99s
database-green-q1gur   1/1     Running           0          99s
Then watch the logs and wait for the
DATABASE IS READY TO USE!message:kk logs -n ${DB_NAMESPACE} -l app=${DB_NAME_GREEN} -fOutput should contain the following:
#########################
DATABASE IS READY TO USE!
#########################
Verify the status is
Healthyand the role isPHYSICAL_STANDBY:kk get sidb -n ${DB_NAMESPACE}Output should look like the following:
NAME             EDITION      STATUS    ROLE
database-blue    Enterprise   Healthy   PRIMARY
database-green                Healthy   PHYSICAL_STANDBY
Configure Data Guard Broker
Deploy the
DataguardBrokerto manage the Data Guard configuration:apiVersion: database.oracle.com/v4 kind: DataguardBroker metadata: name: broker-blue-green namespace: ${DB_NAMESPACE} spec: primaryDatabaseRef: ${DB_NAME_BLUE} standbyDatabaseRefs: - ${DB_NAME_GREEN} protectionMode: MaxAvailability fastStartFailover: false loadBalancer: trueKey configuration parameters:
protectionMode: set toMaxAvailabilityto ensure no data loss if at least one standby is available, transitioning to asynchronous mode if at least one standby is reachable.fastStartFailover: set tofalseto disable automatic failover. When enabled, an Observer process can automatically trigger a failover if the primary database becomes unavailable.loadBalancer: set totrueto create a KubernetesLoadBalancerservice for the broker, providing a stable external IP address that always routes to the current primary database.
Monitor the broker status until it reports
Healthy:kk get dataguardbroker -n ${DB_NAMESPACE} -wOutput should look like the following:
NAME                PRIMARY   STANDBYS   PROTECTION MODE   CONNECT STR   STATUS     FSFO
broker-blue-green                        MaxAvailability                 Creating
broker-blue-green                        MaxAvailability                 Creating
broker-blue-green   ORCLBLUE   ORCLGREEN   MaxAvailability   10.0.0.25:32345/DATAGUARD   Creating   false
broker-blue-green   ORCLBLUE   ORCLGREEN   MaxAvailability   10.0.0.25:32345/DATAGUARD   Healthy    false
The
DataguardBrokercreates a Kubernetes service (broker-blue-green) that automatically routes traffic to the current primary database. This provides a stable connection point for applications. Get this service:kk get svc -n ${DB_NAMESPACE} broker-blue-greenOutput should look like the following. Note the provisioning of both a
CLUSTER-IPfor in-cluster clients, and anEXTERNAL-IPfor external clients using a load balancer:NAME TYPE CLUSTER-IP EXTERNAL-IP PORT(S) AGE broker-blue-green LoadBalancer 10.0.19.198 100.66.38.138 1521:31116/TCP,5500:31842/TCP 8mCheck the endpoints of the broker service. It must initially point to the IP address of the blue pod:
kk get endpoints -n ${DB_NAMESPACE} broker-blue-greenThe output should look like the following, where the blue pod IP should appear instead of
BLUE_POD_IP:NAME ENDPOINTS broker-blue-green [BLUE_POD_IP]:5500,[BLUE_POD_IP]:1521Check the database pods to correlate the IP:
kk get pod -n ${DB_NAMESPACE} -o wide
Test data sync and roles
You now verify replication by writing data to the primary and reading it from the standby using an in-cluster client pod.
Write to primary database with broker service
Deploy a temporary pod to connect to the primary database using the stable broker service:
kk run sqlplus -n ${DB_NAMESPACE} --rm -it --restart=Never \
  --image=${HARBOR_INSTANCE_URL}/${HARBOR_PROJECT}/oracle-instantclient:latest \
  --image-pull-policy=Always \
  --overrides='{"spec": {"imagePullSecrets": [{"name": "'${HARBOR_PULL_SECRET_NAME}'"}]}}' \
  -- sqlplus sys/${ADMIN_PASSWORD}@broker-blue-green:1521/ORCLPDB1 as sysdba
Create a test table:
CREATE TABLE employees (id NUMBER, name VARCHAR2(50));
INSERT INTO employees VALUES (1, 'John Doe');
COMMIT;
SELECT * FROM employees;
exit;
Output should look like the following:
        ID NAME
---------- --------------------------------------------------
        1 John Doe
Read from standby (direct access)
Deploy a temporary pod to connect directly to the standby service:
kk run sqlplus -n ${DB_NAMESPACE} --rm -it --restart=Never \
  --image=${HARBOR_INSTANCE_URL}/${HARBOR_PROJECT}/oracle-instantclient:latest \
  --image-pull-policy=Always \
  --overrides='{"spec": {"imagePullSecrets": [{"name": "'${HARBOR_PULL_SECRET_NAME}'"}]}}' \
  -- sqlplus sys/${ADMIN_PASSWORD}@${DB_NAME_GREEN}:1521/ORCLPDB1 as sysdba
Verify the data replication:
SELECT * FROM employees;
exit;
Output should look like the following:
        ID NAME
---------- --------------------------------------------------
        1 John Doe
Perform a manual switchover
Trigger a manual switchover to reverse the roles, making the green database the
new primary. The operator requires the SID (for example, ORCLGREEN) for the
switchover target.
Run the following command:
kk patch dataguardbroker broker-blue-green -n ${DB_NAMESPACE} --type='merge' \
  -p "{\"spec\":{\"setAsPrimaryDatabase\":\"ORCLGREEN\"}}"
Monitor the switchover progress:
kk get sidb -n ${DB_NAMESPACE} -wThe output should look like the following once the switchover is complete:
NAME             EDITION      STATUS    ROLE
database-blue    Enterprise   Healthy   PHYSICAL_STANDBY
database-green                Healthy   PRIMARY
Confirm that the database instances have switched roles and that the green database is now the primary:
kk get dataguardbroker -n ${DB_NAMESPACE}The output should look like the following:
NAME                PRIMARY     STANDBYS   PROTECTION MODE
broker-blue-green   ORCLGREEN   ORCLBLUE   MaxAvailability
Verify that the
broker-blue-greenservice endpoints have updated to point to the green pod's IP:kk get endpoints -n ${DB_NAMESPACE} broker-blue-greenThe output should look like the following, where the green pod IP should appear instead of
GREEN_POD_IP:NAME ENDPOINTS broker-blue-green [GREEN_POD_IP]:5500,[GREEN_POD_IP]:1521