

This guide outlines the deployment of a self-managed Oracle Database Enterprise instance on a Google Distributed Cloud (GDC) air-gapped standard cluster. This deployment lets you run Oracle workloads within the air-gapped environment, leveraging GDC's existing storage and networking capabilities.
It uses the official Oracle Database Operator for Kubernetes, which automates the lifecycle management of the database.
Architecture
The architecture describes a single-instance Oracle database deployment managed by the Oracle Database Operator within a GDC standard cluster. While this guide demonstrates deploying a single database instance, you can deploy as many instances as your cluster's capacity (RAM, CPU, disk space) allows.
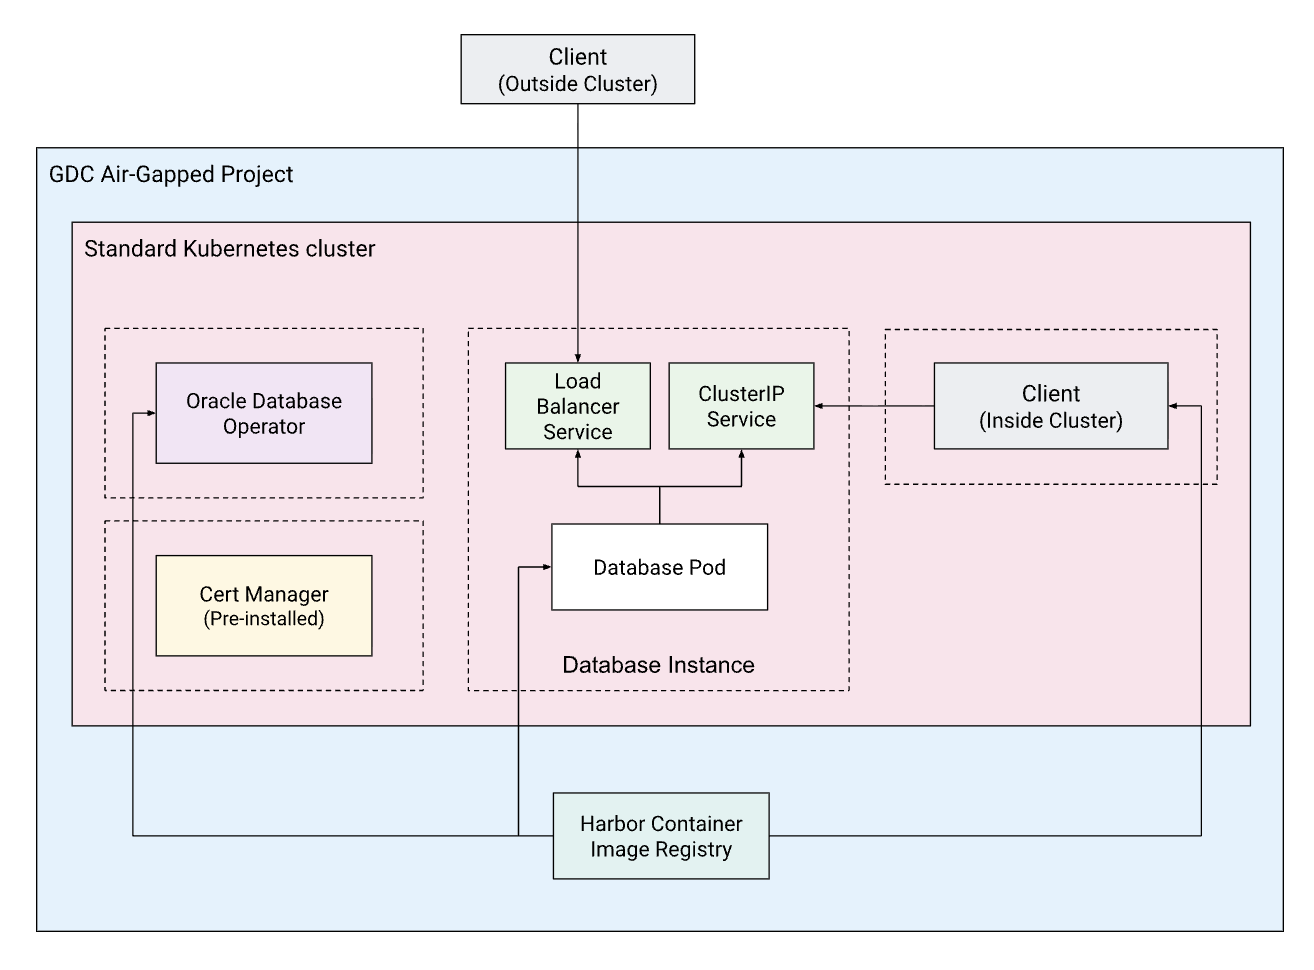
The architecture comprises the following key components:
- GDC project: the project container for your resources.
- Standard Kubernetes cluster: a standard cluster providing the compute resources.
- Oracle Database Operator: a Kubernetes operator that automates the provisioning, lifecycle management, and observability of Oracle databases. It simplifies complex tasks such as patching, backup, and recovery, making it easier to run stateful Oracle workloads in a containerized environment.
- Database instance: the containerized Oracle Single Instance Database (SIDB) with persistent storage.
- Harbor: the private container registry used to host the database, operator, and client images within the air-gapped environment.
- Cert-manager: the operator relies on
cert-managerfor managing webhooks certificates.cert-managercomes pre-installed on GDC standard clusters.
In this guide, you deploy the operator in its own namespace
(oracle-database-operator-system) and the database instance in a separate
namespace (oracle-db). These namespaces are illustrated with dashed-border
boxes in the architecture diagram.
This separation is recommended for clarity and manageability. However, it is up to you to decide how to organize your databases. For example, you might group certain databases in different namespaces to manage granular access control (RBAC) based on workload needs, team ownership, or security specifications.
Before you begin
Before starting the deployment, you must ensure that your environment meets the following requirements:
- Create a project that will serve as the holder for all resources generated throughout this guide.
Give your user the Cluster Admin and Standard Cluster Admin roles for your project. This will allow you to create a standard Kubernetes cluster and manage its resources:
export PROJECT_ID=PROJECT_ID
export USER_NAME=USER_NAME

gdcloud projects add-iam-policy-binding ${PROJECT_ID} \
  --member="user:${USER_NAME}" \
  --role=cluster-admin

gdcloud projects add-iam-policy-binding ${PROJECT_ID} \
  --member="user:${USER_NAME}" \
  --role=standard-cluster-admin
Create a Harbor instance and a Harbor project to host the container images needed for this guide.
Give your user the Harbor Instance Admin role so you can upload images to your Harbor instance:
gdcloud projects add-iam-policy-binding ${PROJECT_ID} \
  --member="user:${USER_NAME}" \
  --role=harbor-instance-admin
Create a Harbor robot account in your Harbor project. Later in this guide, the robot account's credentials will be stored in Kubernetes secrets, enabling the cluster to pull images from Harbor when instantiating containers.
Create a standard Kubernetes cluster with two worker nodes, each having a minimum of 16GB memory. For example:
kubectl --kubeconfig MGMT_API_KUBECONFIG create -f - <<EOF
apiVersion: cluster.gdc.goog/v1
kind: Cluster
metadata:
  name: ${CLUSTER_NAME}
  namespace: ${PROJECT_ID}
spec:
  nodePools:
  - machineTypeName: n3-standard-8-gdc
    nodeCount: 2
    name: ${CLUSTER_NAME}-node-pool
EOF
Set up your environment variables. These will be used throughout the guide to create and reference resources:
# General info
export PROJECT_ID="PROJECT_ID"
export ZONE="ZONE"
export ORG_NAME="ORG_NAME"
export CLUSTER_NAME="CLUSTER_NAME"

# Oracle operator settings
export ORACLE_OPERATOR_VERSION="2.1.0"
export ORACLE_DB_VERSION="23.26.1.0"
export ORACLE_OPERATOR_NAMESPACE="ORACLE_DBS_OPERATOR-SYSTEM

# Harbor config
export HARBOR_INSTANCE_PROJECT_ID="HARBOR_PROJECT_ID"
export HARBOR_INSTANCE_NAME="HARBOR_INSTANCE_NAME"
export HARBOR_INSTANCE_URL="HARBOR_INSTANCE_URL"
export HARBOR_PROJECT="HARBOR_PROJECT"
export HARBOR_PULL_SECRET_NAME="HARBOR_PULL_SECRET_NAME"
export HARBOR_ROBOT_ACCOUNT="robot\$HARBOR_PROJECT+ROBOT_NAME"
export HARBOR_ROBOT_SECRET="HARBOR_ROBOT_SECRET"

# Oracle database config
export ADMIN_PASSWORD="ADMIN_PASSWORD"
export DB_NAMESPACE="DB_NAMESPACE"
export DB_NAME="DB_NAME"
Network note: This guide assumes it is being run from a bastion node that has access to the GDC APIs and also has access to the internet to download the Oracle Operator's manifests and container images. If you are running this from a machine without internet access, you must obtain these assets separately (for example, using
docker saveto export images from a connected machine anddocker loadto import them) and securely upload them to your environment before proceeding.Create an account and obtain an API token at container-registry.oracle.com, and then accept the license agreement for both the Oracle Database Enterprise Edition and Oracle Instant Client images before proceeding.
Load images into Harbor
Since clusters within Google Distributed Cloud air-gapped can't access external registries, you must mirror the required images to your private Harbor instance.
Sign in to Oracle Container Registry
You must first authenticate with the official Oracle registry to pull the base images:
docker --config=./docker-oracle login container-registry.oracle.com
After a successful login, credentials will be saved in
./docker-oracle/config.json.
Load images into Harbor
Authenticate with your private Harbor instance:
docker --config=./docker-harbor login ${HARBOR_INSTANCE_URL} \
  -u ${HARBOR_ROBOT_ACCOUNT} \
  -p ${HARBOR_ROBOT_SECRET}
After a successful login, the robot account's credentials will be saved in
./docker-harbor/config.json.
Pull, tag, and push images
Download the images from the official Oracle Container Registry and push them to your internal Harbor project. You will mirror the operator, the enterprise database, and the instant client for testing.
Mirror the Oracle Database Operator image:
docker --config=./docker-oracle pull \
  container-registry.oracle.com/database/operator:${ORACLE_OPERATOR_VERSION} \
  --platform linux/amd64
docker tag container-registry.oracle.com/database/operator:${ORACLE_OPERATOR_VERSION} \
  ${HARBOR_INSTANCE_URL}/${HARBOR_PROJECT}/oracle-operator:${ORACLE_OPERATOR_VERSION}
docker --config=./docker-harbor push \
  ${HARBOR_INSTANCE_URL}/${HARBOR_PROJECT}/oracle-operator:${ORACLE_OPERATOR_VERSION}
Mirror the Oracle database Enterprise image:
docker --config=./docker-oracle pull \
  container-registry.oracle.com/database/enterprise:${ORACLE_DB_VERSION} \
  --platform linux/amd64
docker tag container-registry.oracle.com/database/enterprise:${ORACLE_DB_VERSION} \
  ${HARBOR_INSTANCE_URL}/${HARBOR_PROJECT}/oracle-enterprise:${ORACLE_DB_VERSION}
docker --config=./docker-harbor push \
  ${HARBOR_INSTANCE_URL}/${HARBOR_PROJECT}/oracle-enterprise:${ORACLE_DB_VERSION}
Mirror the Oracle Instant Client image:
docker --config=./docker-oracle pull container-registry.oracle.com/database/instantclient:latest \
  --platform linux/amd64
docker tag container-registry.oracle.com/database/instantclient:latest \
  ${HARBOR_INSTANCE_URL}/${HARBOR_PROJECT}/oracle-instantclient:latest
docker --config=./docker-harbor push ${HARBOR_INSTANCE_URL}/${HARBOR_PROJECT}/oracle-instantclient:latest
Configure cluster access
Before deploying resources, retrieve the credentials for your standard cluster and create a convenient alias:
Retrieve the kubeconfig for your standard cluster:
KUBECONFIG=kubeconfig-${CLUSTER_NAME}.yaml gdcloud clusters \
  get-credentials ${CLUSTER_NAME} \
  --standard \
  --project ${PROJECT_ID} \
  --zone ${ZONE}
Create the
kkalias to simplify subsequent commands:alias kk="kubectl --kubeconfig kubeconfig-${CLUSTER_NAME}.yaml"
Create secrets
Create a Kubernetes secret to allow the cluster to pull images from Harbor
using the credentials saved in your local ./docker-harbor/config.json. You
need this secret in both the operator's namespace (to pull the operator image)
and the database's namespace (to pull the database image).
Create the namespace for the operator:
kk create ns ${ORACLE_OPERATOR_NAMESPACE}Create the pull secret for the operator:
kk create secret docker-registry ${HARBOR_PULL_SECRET_NAME} \
  --from-file=.dockerconfigjson=./docker-harbor/config.json \
  -n ${ORACLE_OPERATOR_NAMESPACE}
Create the namespace for the database:
kk create ns ${DB_NAMESPACE}Create the pull secret for the database:
kk create secret docker-registry ${HARBOR_PULL_SECRET_NAME} \
  --from-file=.dockerconfigjson=./docker-harbor/config.json \
  -n ${DB_NAMESPACE}
Install the Oracle Database Operator
You now install the Oracle Database Operator into your cluster by applying three manifests:
Cluster Role Binding: Sets up the necessary permissions for the operator to function cluster-wide.
kk apply -f https://raw.githubusercontent.com/oracle/oracle-database-operator/refs/tags/v${ORACLE_OPERATOR_VERSION}/rbac/cluster-role-binding.yamlNode RBAC: Grants permissions to read node topology, which is critical for correct pod scheduling.
kk apply -f https://raw.githubusercontent.com/oracle/oracle-database-operator/refs/tags/v${ORACLE_OPERATOR_VERSION}/rbac/node-rbac.yamlOperator Deployment: Deploys the operator pods and custom resource definitions (CRDs). This command downloads the official manifest, replaces the image path with your Harbor URL, injects the
imagePullSecretsconfiguration so Kubernetes can authenticate with Harbor, and applies the result:curl -L https://raw.githubusercontent.com/oracle/oracle-database-operator/refs/tags/v${ORACLE_OPERATOR_VERSION}/oracle-database-operator.yaml \ | sed "s|container-registry.oracle.com/database/operator:latest|${HARBOR_INSTANCE_URL}/${HARBOR_PROJECT}/oracle-operator:${ORACLE_OPERATOR_VERSION}|g" \ | awk "/terminationGracePeriodSeconds: 10/{print; print \" imagePullSecrets:\n - name: ${HARBOR_PULL_SECRET_NAME}\"; next}1" \ | kk apply -f -Wait for the operator pods to be running:
kk get pods -n ${ORACLE_OPERATOR_NAMESPACE} --watchThe output should look like the following:
NAME                                                           READY   STATUS    RESTARTS   AGE
oracle-database-operator-controller-manager-5f7b56874d-k9v4z   1/1     Running   0          45s
oracle-database-operator-controller-manager-5f7b56874d-n2x8m   1/1     Running   0          45s
oracle-database-operator-controller-manager-5f7b56874d-r6z7q   1/1     Running   0          45s
Deploy a new database instance
With the operator running, you can now deploy a single-instance Oracle database. This guide creates a basic Enterprise Edition instance suitable for development or testing.
Create a Kubernetes secret to store the database administrative password:
kk create secret generic oracle-db-password \
  --from-literal=password=${ADMIN_PASSWORD} \
  -n ${DB_NAMESPACE}
Apply the
SingleInstanceDatabasemanifest to create the database:apiVersion: database.oracle.com/v4 kind: SingleInstanceDatabase metadata: name: ${DB_NAME} namespace: ${DB_NAMESPACE} spec: sid: ORCLCDB pdbName: ORCLPDB1 edition: enterprise replicas: 1 image: pullFrom: ${HARBOR_INSTANCE_URL}/${HARBOR_PROJECT}/oracle-enterprise:${ORACLE_DB_VERSION} pullSecrets: ${HARBOR_PULL_SECRET_NAME} prebuiltDB: true persistence: size: 50Gi storageClass: standard-rwo accessMode: ReadWriteOnce adminPassword: secretName: oracle-db-password secretKey: passwordsid/pdbName: defines the System Identifier (SID) and pluggable database (PDB) name.edition: specifies the database edition (enterprisein this case).image: points to your private Harbor registry image.persistence: requests a 50Gi persistent volume using thestandard-rwoStorageClass, which creates a zonal persistent disk in GDC.replicas: sets the number of pods to1. While1is typical for a single instance, you can increase this for specific use cases like rolling updates (where a new pod is created before the old one terminates) or if you are using a shared storage backend that supports concurrent access. For basic, single-instance deployments,1is the standard.
For a complete list of configuration options, including custom init parameters and resource limits, refer to the official documentation.
The database creation is resource-intensive and might take 10 to 20 minutes.
Wait until the database pod is
Running:kk get po -n ${DB_NAMESPACE} -l app=${DB_NAME} -wThe output should look like the following:
NAME                   READY   STATUS    RESTARTS   AGE
my-db-i5xdj   0/1     Pending   0          0s
my-db-i5xdj   0/1     Pending   0          0s
my-db-i5xdj   0/1     Pending   0          1s
my-db-i5xdj   0/1     Init:0/1   0          1s
my-db-i5xdj   0/1     PodInitializing   0          98s
my-db-i5xdj   0/1     Running           0          99s
my-db-i5xdj   1/1     Running           0          99s
Then watch the logs and wait for the
DATABASE IS READY TO USE!message:kk logs -n ${DB_NAMESPACE} -l app=${DB_NAME} -fThe output should contain the following:
#########################
DATABASE IS READY TO USE!
#########################
Verify the status is
Healthy:kk get singleinstancedatabase -n ${DB_NAMESPACE}The output should look like the following:
NAME    EDITION      STATUS    ROLE
my-db   Enterprise   Healthy   PRIMARY
Access and expose the database
By default, the operator creates two services for the database:
${DB_NAME}(ClusterIP): for internal traffic within the cluster. Use this stable DNS name for applications running inside the same cluster.${DB_NAME}-ext(NodePort): for external access. By default, this exposes the database on a high port on every node. You can upgrade it to a load balancer service by settingloadBalancer: truein theSingleInstanceDatabasespec.
For more information on how to customize these services, such as defining specific NodePorts, refer to the GitHub documentation.
Choose one of the following methods to access your database depending on your needs. For more details on GDC service types, refer to Expose Services.
Access within the cluster (ClusterIP)
To access the database from other pods running within the same Kubernetes
cluster, use the ClusterIP service.
- To verify this securely, connect directly from a temporary client pod.
- Check the available services in your namespace. Note the
ClusterIPservice named${DB_NAME}(for example,my-db). This name serves as the hostname for internal connections. Deploy a temporary pod containing the SQL*Plus client. You use the
instantclientimage mirrored to your Harbor registry:kk run sqlplus-client -n ${DB_NAMESPACE} --rm -it --restart=Never \ --image=${HARBOR_INSTANCE_URL}/${HARBOR_PROJECT}/oracle-instantclient:latest \ --image-pull-policy=Always \ --overrides='{"spec": {"imagePullSecrets": [{"name": "'${HARBOR_PULL_SECRET_NAME}'"}]}}' \ -- sqlplus sys/${ADMIN_PASSWORD}@${DB_NAME}:1521/ORCLPDB1 as sysdbaYou should see the SQL prompt indicating a successful connection.
Create a sample table to verify write access:
CREATE TABLE employees (id NUMBER, name VARCHAR2(50));
INSERT INTO employees VALUES (1, 'John Doe');
COMMIT;
SELECT * FROM employees;
The output should look like the following:
        ID NAME
---------- --------------------------------------------------
        1 John Doe
Exit the session:
exit
Access within the VPC (internal load balancer)
To expose the database to other resources (like VMs) located within the same GDC project or VPC, but outside the Kubernetes cluster, use an internal load balancer. This keeps traffic private within your isolated network environment. See the GDC internal load balancer documentation for more details.
Since the operator does not automatically support adding annotations to the
generated service, you must create a separate service resource. Note the
networking.gke.io/load-balancer-type: internal annotation, which is required
to provision an internal load balancer.
Create the internal load balancer service:
apiVersion: v1
kind: Service
metadata:
  name: ${DB_NAME}-internal
  namespace: ${DB_NAMESPACE}
  annotations:
    networking.gke.io/load-balancer-type: internal
spec:
  type: LoadBalancer
  selector:
    app: ${DB_NAME}
  ports:
  - name: sqlnet
    port: 1521
    targetPort: 1521
Retrieve the internal IP address:
export DB_INT_IP=$(kk get svc ${DB_NAME}-internal -n ${DB_NAMESPACE} \
  -o jsonpath='{.status.loadBalancer.ingress[0].ip}')
echo "Database Internal IP: ${DB_INT_IP}"
Access from outside the VPC (external load balancer)
To expose the database to clients completely outside the GDC environment or VPC (for example, from a corporate network or external client), you can use an external load balancer. This assigns an IP address reachable from outside the isolated VPC boundary. See the GDC external load balancer documentation for more details.
To create an external load balancer, update the SingleInstanceDatabase spec
to set loadBalancer: true. This changes the existing ${DB_NAME}-ext
service type from NodePort to LoadBalancer.
Update the specification:
kk patch sidb ${DB_NAME} -n ${DB_NAMESPACE} --type='merge' \
  -p '{"spec":{"loadBalancer":true}}'
Retrieve the external IP address:
export DB_EXT_IP=$(kk get svc ${DB_NAME}-ext -n ${DB_NAMESPACE} \
  -o jsonpath='{.status.loadBalancer.ingress[0].ip}')
echo "Database External IP: ${DB_EXT_IP}"
What's next
- Self-managed Oracle database reference architecture
- Deploy highly-available self-managed Oracle databases